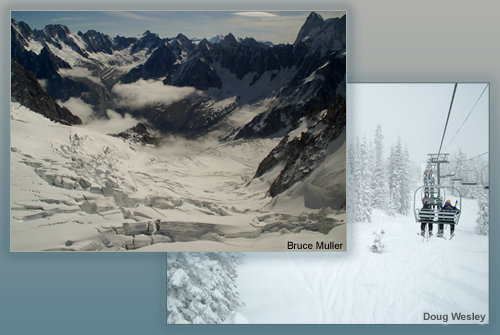
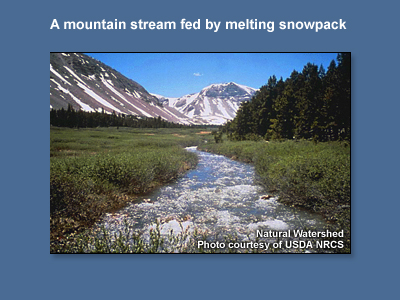
Snowpack is the lifeblood of the U.S. Rocky Mountain west and other mountainous areas of the world.
Although mountain ranges cover a very small fraction of the Earth's land regions, the water stored
in their snowpack feeds lakes and rivers, which irrigate crops and supply water for many of the
world's heavily populated areas.
Ski areas bring in tourist dollars that bolster or even form the backbone of local economies.
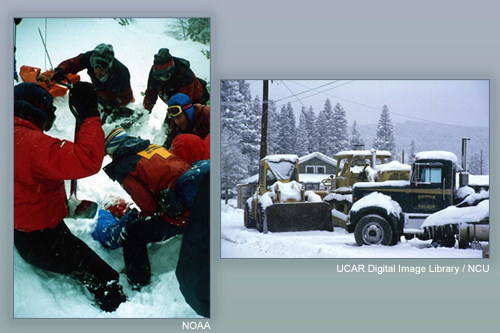
Snowpack is not always beneficial though. Large amounts of money are spent on public transportation
and safety during snow events, and dozens of people are killed annually in avalanches.
As winter transitions to spring, rapid snowmelt can cause flooding and flash flooding, even when
atmospheric conditions are dry. In addition, dry winters can worsen drought conditions.
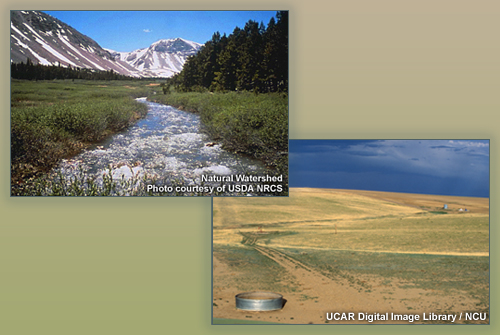
Snowpack assessment is the measurement and interpretation of snowpack. It is needed by hydrologists
and those involved with commerce, public safety, and recreation to deal with the concerns outlined
above. The data are also critical to climate researchers who use them to monitor climate trends.
Scientists in other disciplines use snowpack data as well. For example, biologists use them to study
the impact of snow on animal migration and the daily life cycles of burrowing animals, and chemists
use them to examine how chemical components become part of the clouds, precipitate into snowpack,
and are contained in runoff.
Perspectives on Snowpack
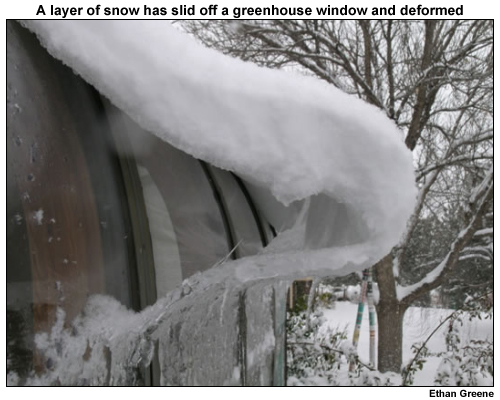
Dr. Ethan Greene is the director of the Colorado Avalanche Information Center
(CAIC), which issues backcountry avalanche forecasts and educates the public about avalanche
conditions and dangers. At various points throughout the module, Ethan will discuss topics related
to snowpack development and evolution. He will also demonstrate manual snowpack assessment
techniques. Here is his introduction.
Matt Kelsch is a meteorologist at the University Corporation for Atmospheric
Research. Hear him discuss hydrologic concerns regarding snowpack.
Dr. Doug Wesley is a meteorologist at the University Corporation for Atmospheric
Research. Here he talks about forecasting concerns and snowpack assessment.
Jay Irwin is a backcountry skier who survived an avalanche in 2009. Here's his
story.
Module structure & goals
This module introduces you to the science of snowpack and its assessment. We begin by exploring the
factors involved in snowpack development and evolution. The evolution section is structured around
two scenarios differentiated by terrain: one takes place in a relatively flat area, the other in a
mountainous region. The final section examines both in-situ (onsite) and satellite-based snowpack
assessment techniques.
By the end of the module, you should be able to:
Describe the key factors involved in snowpack development at the global, regional, local, and
micro scales
Describe the factors involved in snowpack evolution
Describe the primary in-situ and remote sensing techniques used to assess and monitor snowpack
The module is intended for those interested in snowpack and its assessment, including weather
forecasters, emergency managers, hydrologists, recreationalists, and climate researchers. To get the
most out of the module, it is useful to have a basic understanding of Earth's surface and
atmosphere, including geography, precipitation, wind, and temperature.
Snowpack Environment
Global
Introduction
Why do certain parts of the world receive a lot of snow while other places at similar latitudes are
arid? The difference is due to climate, climate being the set of meteorological conditions that
prevail in a particular place over a long period of time.
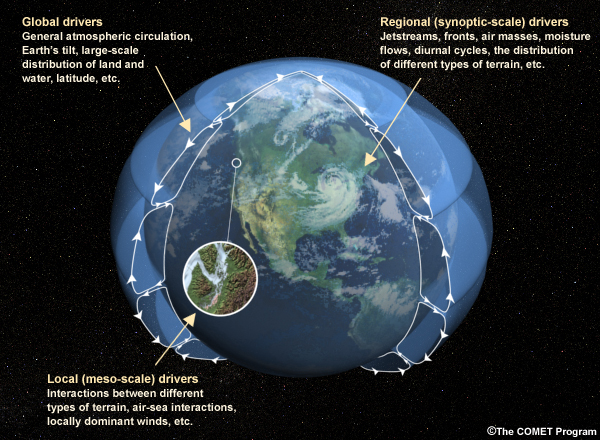
Climate is determined by a wide range of factors at the global, regional, and local scales. Examples
are displayed on the graphic.
In this section, we will describe the types of snowpack found throughout the world and examine the
global-scale factors that create and impact snowpack.
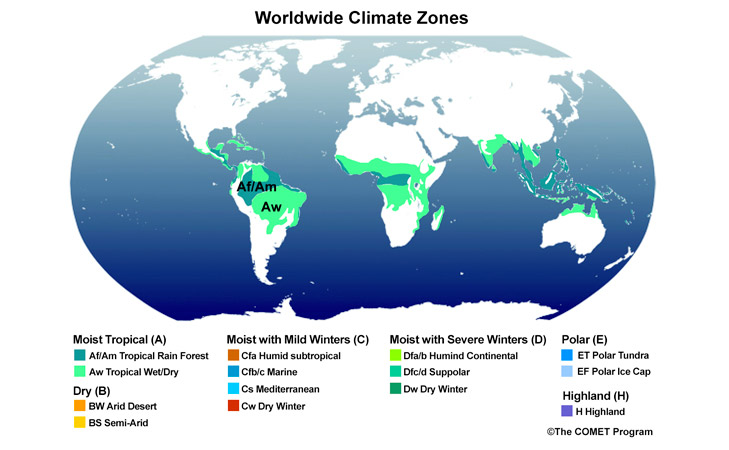
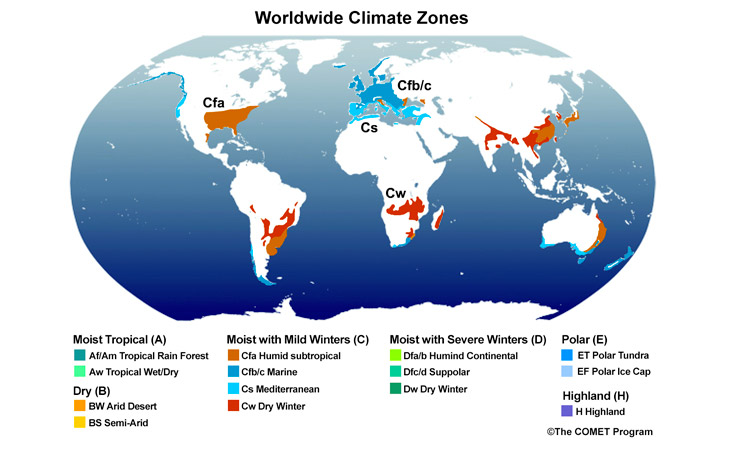
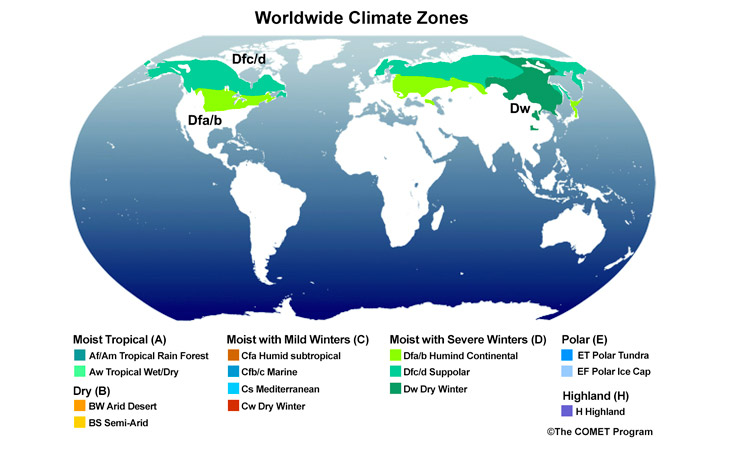
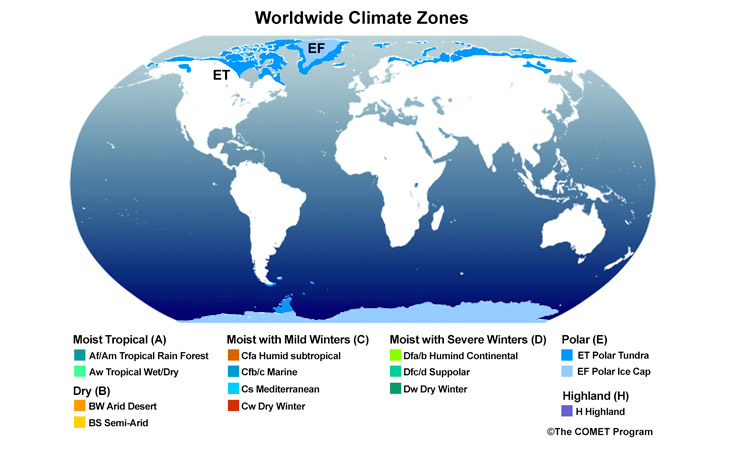
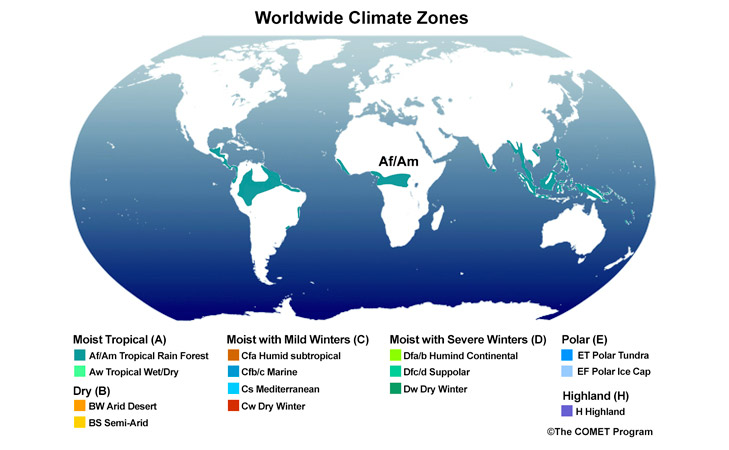
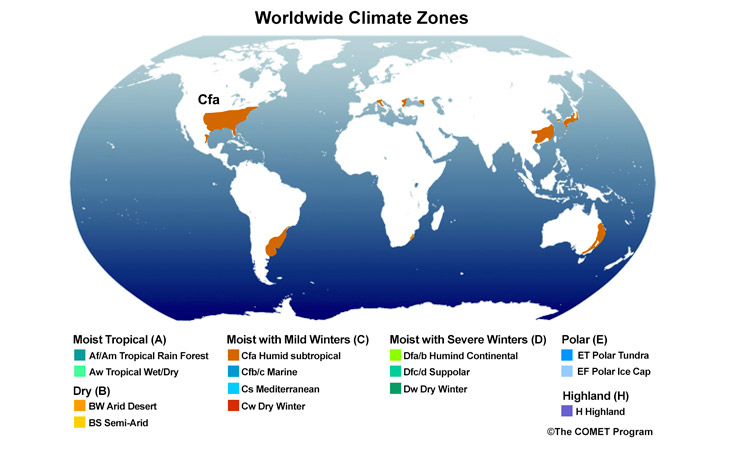
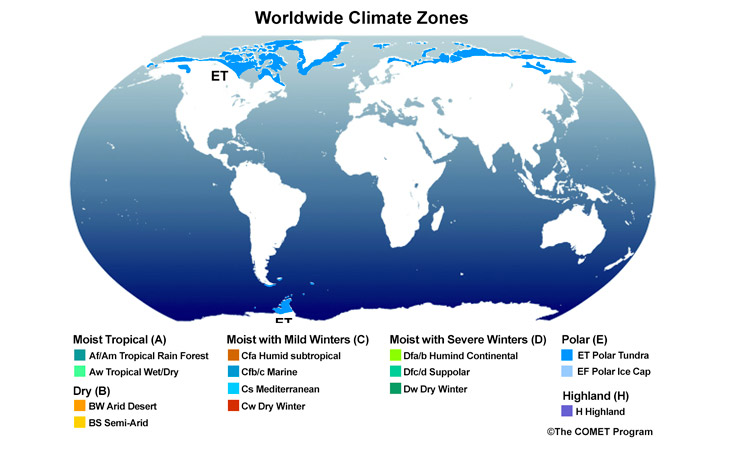
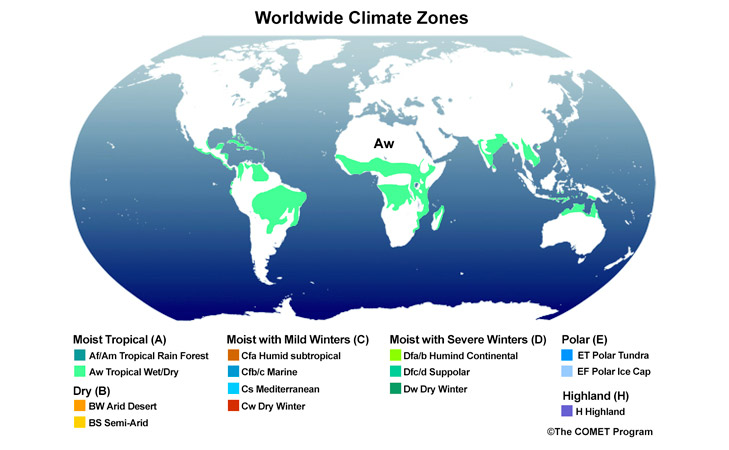
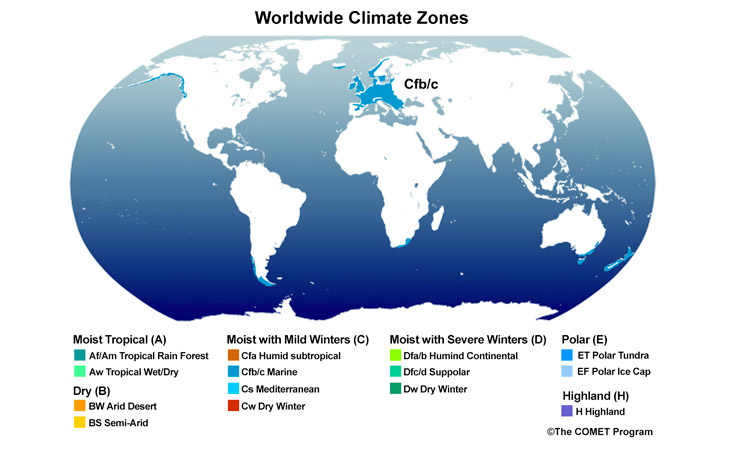
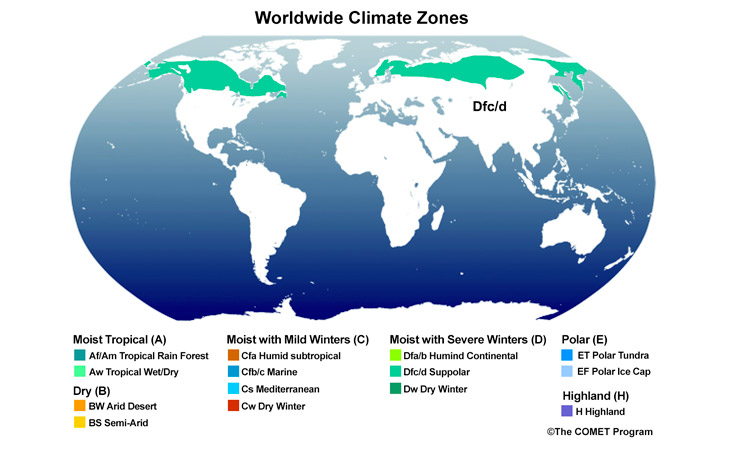
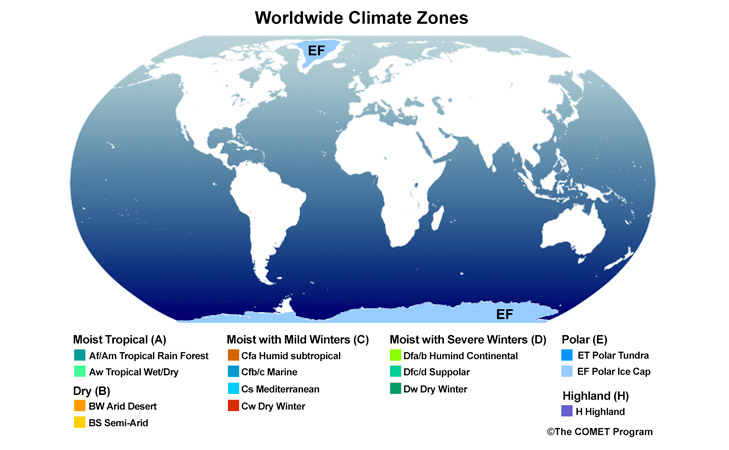
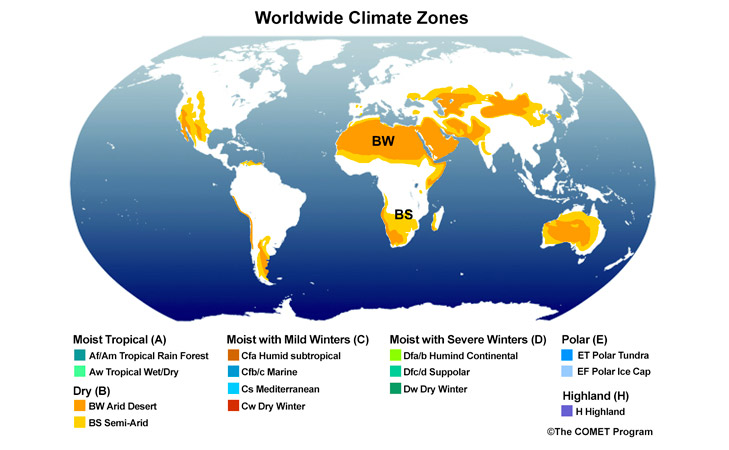
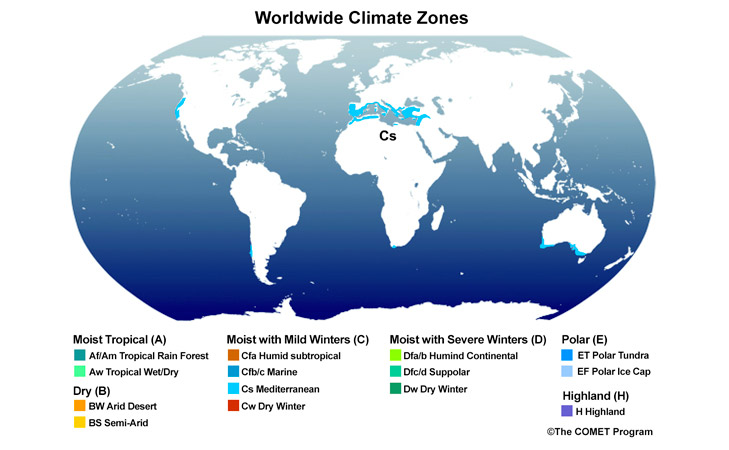
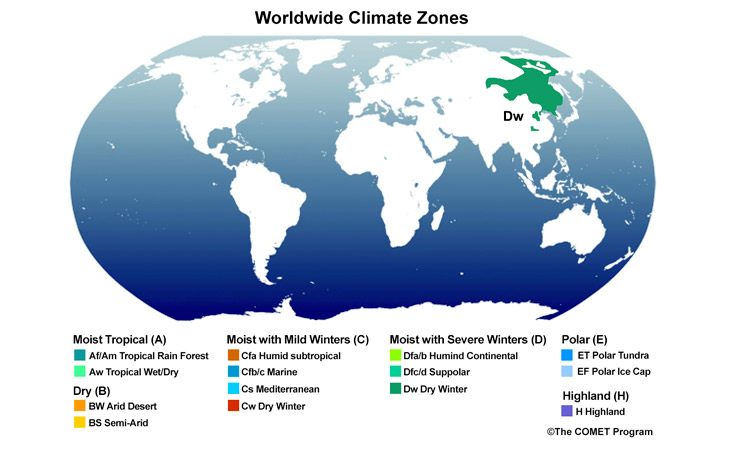
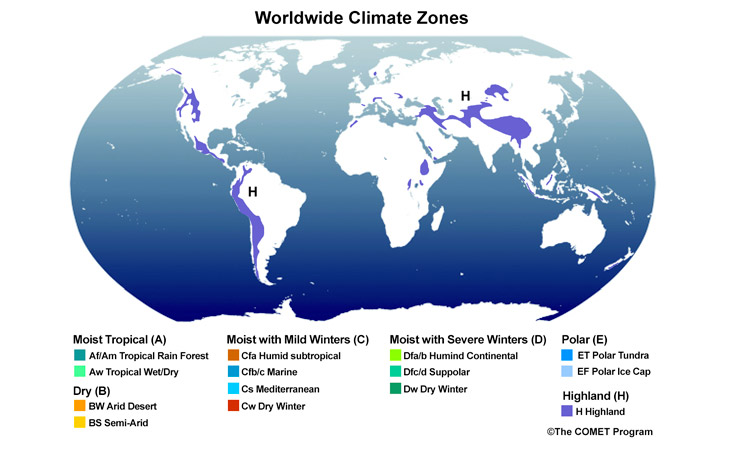
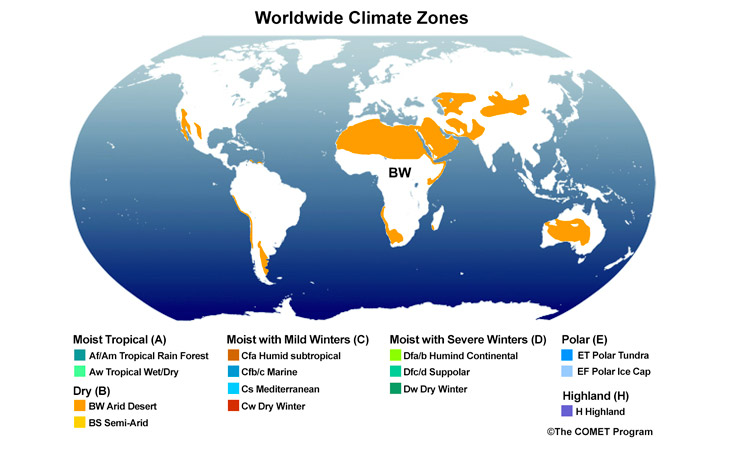
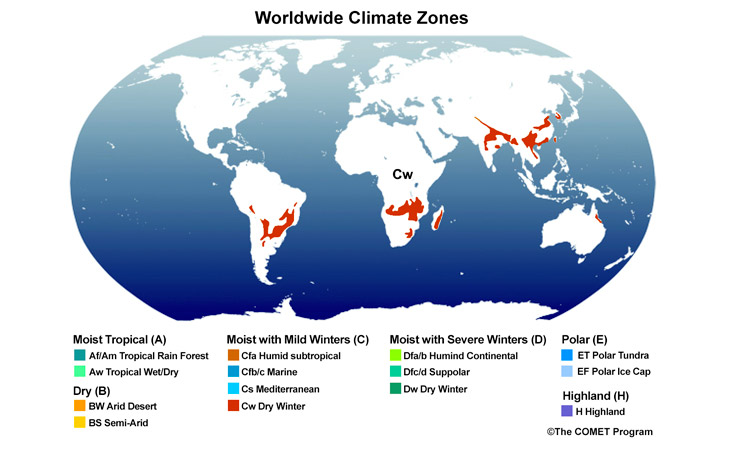
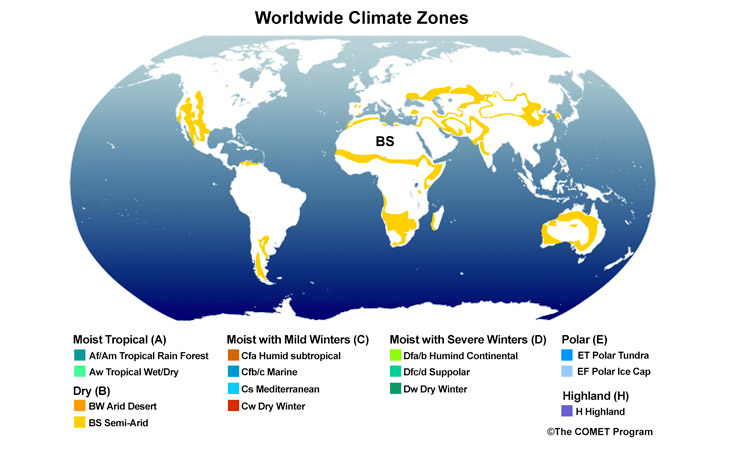
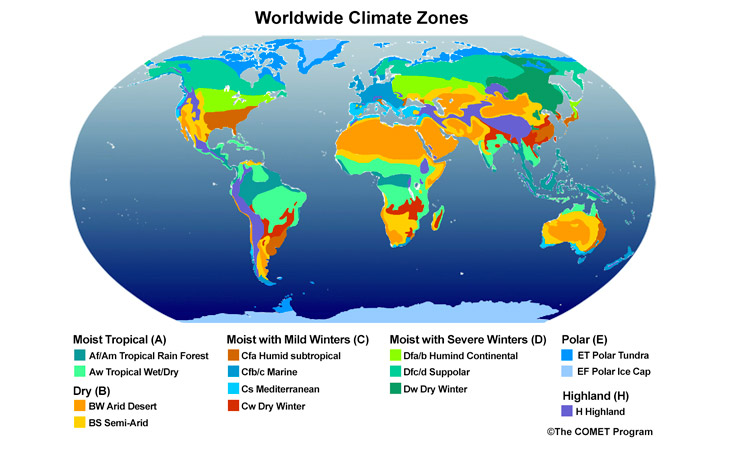
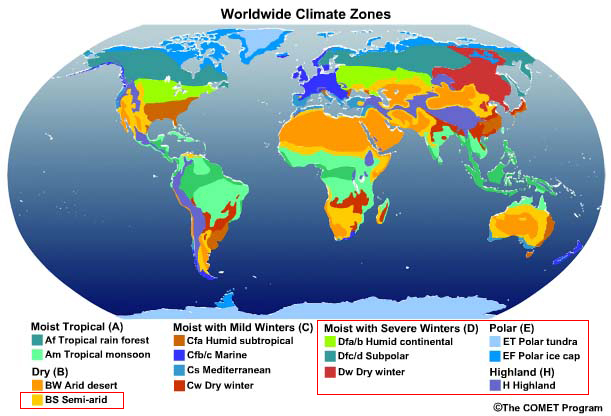
Climate Zones
Various schemes are used to categorize the world's climate zones, notably the Köppen-Geiger climate
classification scheme.
Mouse over each classification name, in the text above the photo, to see its areas on the
map.
Which zones would you expect to have snowpack during part or all of a given year?
Select the correct choices below, then click Done.
The correct answers are a, b, c, d, e, f and h.
Regions of semi-permanent snowpack (Polar tundra and Polar ice
cap) are found at high latitudes across the globe. Seasonal snowpack is found at
high elevations in all latitudes (Highland, Moist with severe winters, and
Semi-arid).
Terrain is a major factor in determining the environment for snowpack. Most mountain
ranges of the world receive enough snowfall to create annual or permanent snowpack
and are in the Highland climate zone.
Please make a selection.
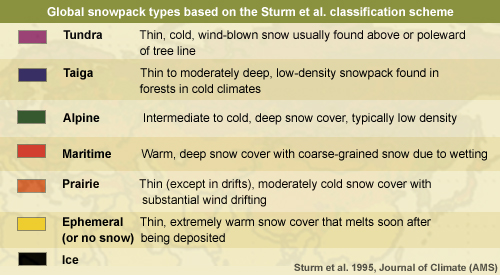
Snowpack Types
The factors that create climate also produce various types of snowpack.
This graphic shows the type of snowpack received by each region of the Northern Hemisphere. As you
can see, tundra snowpack covers the largest portion, followed by taiga snowpack.
If you live in an area that receives snow, what type of snow does it get? How well does the
description match your experience of the area?
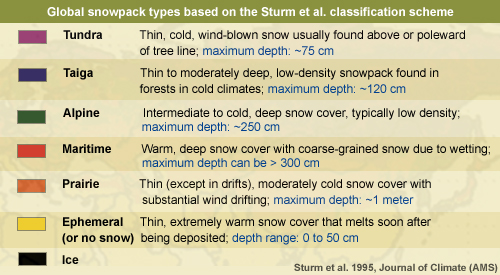
Snow Classes
The table has been expanded to include the depth ranges of the various types of snowpack.
Notice that on a global scale, maritime areas receive the deepest snowfalls. Why is this
so?
Select the correct answers, then click Done.
The correct answers are b and c.
The ocean supplies atmospheric moisture and relatively warm air
temperatures that create large snow depths and heavy, wet, high-density snow.
Please make a selection.
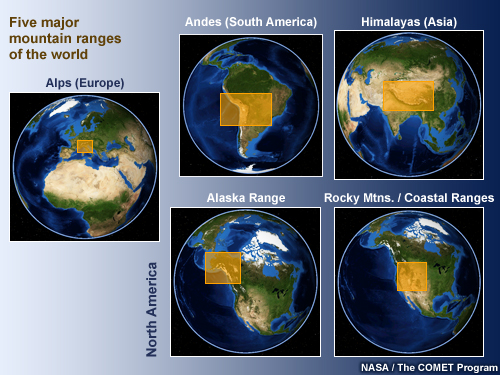
Major Mountain Ranges
Here are the major mountain ranges of the world, all of which accumulate deep, annual snowpacks.
We've finished looking at the types and locations of snowpack. Next, we'll examine the global-scale
factors that create and impact snowpack.
Elevation, Latitude, Terrain
Although maritime areas receive the largest snow events, high-elevation areas at middle
and high latitudes (30 to 35 degrees and higher) have the largest average annual
snowpacks. Why do they accumulate such deep snowpacks?
Select the correct answers, then click Done.
All of the options are correct.
As latitude increases, winter temperatures get colder, creating conditions
that are conducive to significant snowfall events. The cold temperatures
also minimize cold season melting. Note that while some regions are cold
enough for snow, they do not receive enough cold season precipitation to
establish an extensive snowpack.
The polar jet stream defines the path of the strongest midlatitude storm
systems, which produce heavy precipitation.
On average, higher elevations have colder temperatures.
Wind blowing upslope cools. If there's a large elevation gain and the air is
sufficiently humid, clouds will form and precipitation will fall.
Please make a selection.
Annual Precipitation
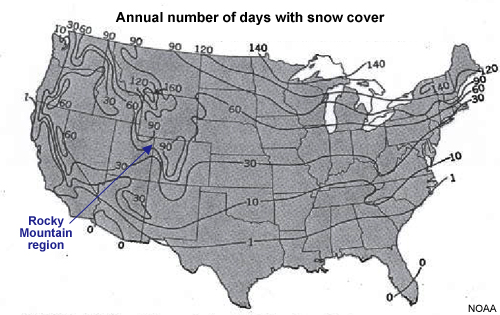
The impact of terrain is clearly evident in this plot of the annual number of days of snow cover for
the continental U.S. (CONUS). The areas of greatest annual snowfall coverage correlate with mountain
ranges as well as latitude. Notice that areas within the Rocky Mountain region of the western U.S.
have the most days with snow cover.
Most mountain ranges in the United States are generally oriented north-south. Which side
of these mountains would you expect to receive the greatest annual number of days of
snowfall?
Select the correct answers, then click Done.
The correct answer is b.
Due to the large-scale prevailing west-to-east flow aloft that
drives midlatitude storm systems, the upwind (or west in the CONUS) sides of
mountains typically receive several times the snowpack depth of downwind sides at
the same elevation.
Please make a selection.
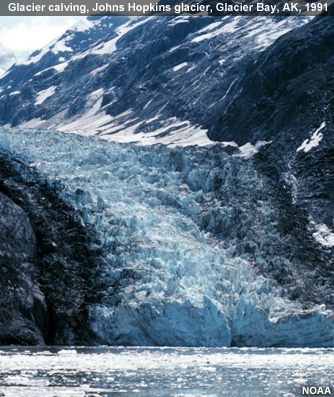
Glaciers
Glaciers are semi-permanent, large masses of ice that form when snow accumulates over time, turns to
ice, and starts flowing downhill under the pressure of its own weight. In polar and high-altitude
alpine regions, glaciers accumulate more snow in the winter than they lose in the summer from
melting and sublimation. As more snow accumulates, air spaces collapse, snow grains recrystallize,
and the buried layers slowly grow together to form a thickened mass of ice. This dense ice usually
looks somewhat blue.
Glaciers are common at high latitudes and in high-elevation areas of the lower-latitude mountain
ranges of the Andes, Rocky Mountains, Alps, and Himalayas.
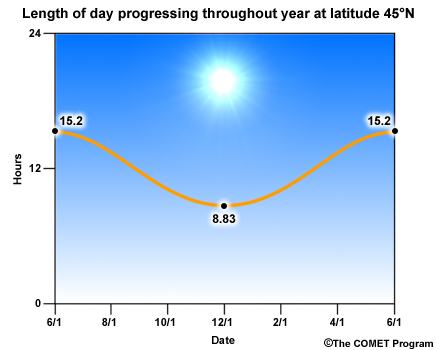
Solar Variation
At latitudes where snowpack is typically found, the amount of solar energy varies significantly
throughout the year.
Although the smallest amount of solar energy reaches the Earth's surface in the Northern
Hemisphere in late December, snowpack depths peak during late winter/early spring. This is due
to two main factors.
Snowpack is cumulative, typically deepening throughout the cold season
Snowpack depth does not decrease significantly until melting offsets replenishment by new
snowfall. In areas north of the Equator, daytime lengths increase most rapidly during the
late March period—the point at which days become longer than nights. On average, this is
when daytime melting exceeds new snow accumulation.
You might think that the coldest temperatures of the year would correlate with the shortest days.
But that's not typically the case. The coldest ground and atmospheric temperatures of the year
typically lag behind the winter solstice (December 21 in the Northern Hemisphere) when the
minimum solar energy reaches the Earth's surface. That's because the thermal energy stored in
the ground from the previous summer and fall delays the coldest temperatures until after the
winter solstice.
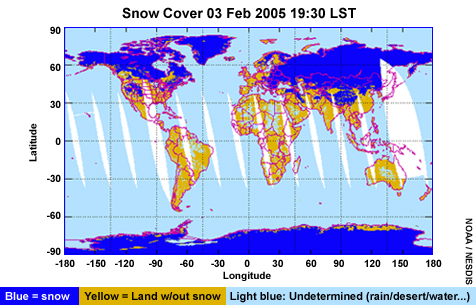
Remote Sensing and Monthly Snowpack Observations
How do we know how much of the world is covered in snow or where the deepest snowpacks are located?
While snowpack measurements taken at particular sites provide point-specific data, satellite
observations provide global information about snowpack and have revolutionized snowpack assessment
on a global scale. For example, they enable us to observe and quantify the percentage of land
covered with snow as well as snowpack depths and temperatures around the world.
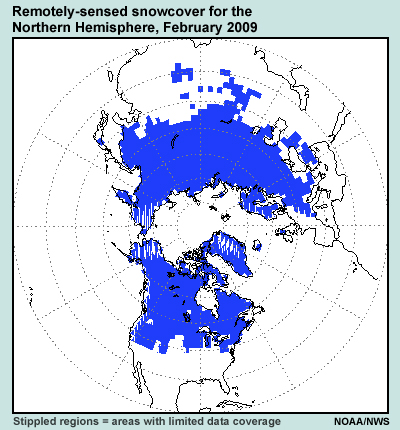
This satellite product shows snow coverage for the Northern Hemisphere in February 2009. For
latitudes higher than 40° to 50°, we see that much of the land surface is covered with snow, which
is typical for midwinter continental conditions.
Regional and Smaller Scale
Introduction
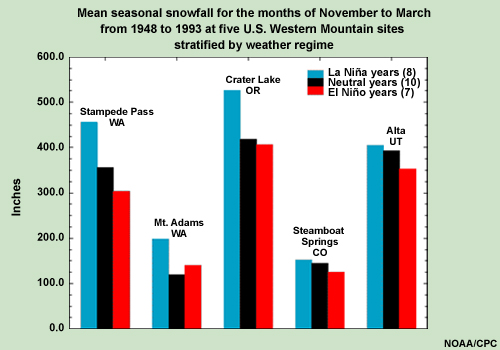
This plot shows how seasonal snowfall amounts vary across sites in the western United States,
with striking differences occurring during some ENSO events.
The peak times for annual snowfall maxima vary from early to late winter based on factors such as
the typical progression of the jet stream, surface storm systems, and moisture sources. For
example, the Cascade Mountains receive most of their snowfall in December and January, while the
Denver area east of the Rocky Mountains peaks in March.
What causes these variations? What creates the different types of snowpack found around the
world? In the previous section, we examined the global-scale factors that play a role in
snowpack development. Now we'll explore the regional- and local-scale factors that have an
impact, such as geography, precipitation type, and wind.
Influence of Geography & Wind on Snow Distribution
While large-scale terrain features impact snowpack on the global scale, terrain plays an even more
important role in snowpack development and evolution at regional and local scales. Regional
topographic features, such as mountain ranges on the scale of tens of kilometers, produce large
annual snowpacks due to their influence on the prevailing atmospheric flow. Mountains force the
prevailing flow upward, producing moisture-laden clouds that enhance snowfall.
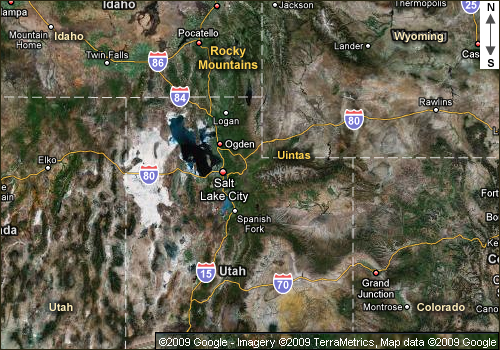
Mountain ranges oriented north-south, such as the Rocky Mountains, enhance snowfall when winds are
perpendicular to the mountains (from the west or east). In contrast, ranges oriented east-west, such
as the Uintas, have the heaviest terrain-enhanced snowfall with southerly or northerly flow.
Terrain is even more complex at the local level, with individual peaks, valleys, moisture sources,
and other features creating their own local impacts on snowpack. This results in large horizontal
variations in snowpack.
In the next few pages, we will examine other factors that impact snowpack development.
Mountainous Terrain, 1
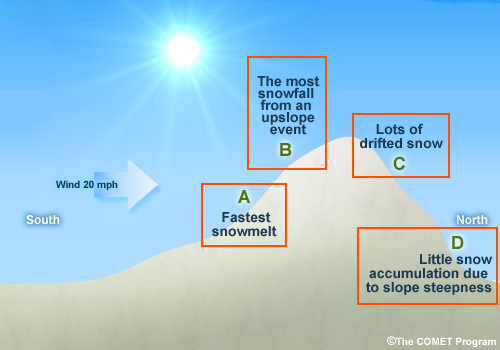
In this scenario in the Northern Hemisphere, which location is most likely to
experience the following: the fastest snowmelt, little snow accumulation due to
slope steepness, lots of drifted snow, and the most snowfall from an upslope event?
Select the correct answer in the box beside each location.
Note that each answer should only be selected once.
When you are finished, click Done.
The answers are discussed in more detail on the next page.
Please make a selection.
Mountainous Terrain, 2
Click the highlighted areas in the graphic for more information.
Area
A, Fastest Snowmelt:
While the sun has a generally uniform effect over
snowpack surfaces on flat terrain,
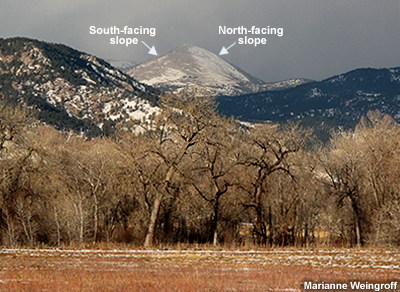
it's different in complex terrain. The interaction of
aspect (the direction that a
slope faces), time of day, temperature, and cloud cover
determine how snowpack depth
evolves on mountain slopes. In general, in the Northern
Hemisphere, south-facing
slopes get greater solar exposure, which causes the most
frequent and rapid
snowmelt, and thus the lowest snow depths.
Area
B, The Most Snowfall from an
Upslope Event
The prevailing wind direction during a precipitation
event is critical for the
resulting snow accumulation, with the upwind side of a
mountain (the upslope side)
typically receiving the most snow. Downslope winds tend
to dry out the atmosphere
and quickly reduce snowfall.
Area
C, Lots of Drifted Snow
Wind has three primary effects on snowfall and snowpack.
It fractures snowflakes in the air, breaking them
into small pieces of ice that
pack together and form dense layers of
wind-deposited snow where they land.
Wind picks up the top portion of the snowpack,
fractures the crystals, and
deposits them downwind, increasing snow depth and
density where they fall.
Wind enhances sublimation, the evaporation of
snowpack. When relatively dry air
is present, sublimation is always occurring (the top
of the pack is always
evaporating). Wind enhances the process by quickly
removing the water molecules
near the ice surface. Note that snow in tree
canopies can sublimate particularly
quickly due to the enhanced exposure to dry air and
wind. In some areas, nearly
half of the annual snowfall can sublimate in this
way.
Area
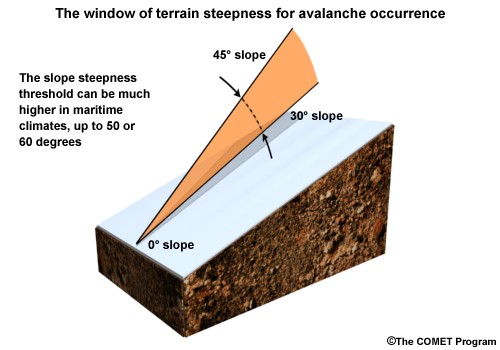
D, Little Snow Accumulation
Due to Slope Steepness
In general, snow does not accumulate much on slopes
steeper than 45 degrees. It
slides off in avalanches during or immediately after
snowstorms. (An avalanche is a
large mass of snow or other material that moves swiftly
down a mountainside or over
a precipice.)
Note that the steepness angle can be as high as 50- or
even 60-degrees in maritime
climates, such as the coastal mountain ranges of North
America.
Most avalanches tend to occur on slopes between 30 and 45
degrees. These avalanches
are often large and can remove much of the snow from the
slope. Avalanches rarely
occur on slopes less steep than 30 degrees.
Variations in Snow Accumulation
The table describes snowpack accumulation in various settings, with the
difference in amounts due
largely to wind.
Assume that a 10-cm (4-in) snowfall with significant wind occurs over
level plains that are fallow;
that is, they haven't been planted, plowed, or harvested in a long time.
A tree cluster would slow down the wind, with snow accumulations as much
as 2.4 times higher than in
open areas (up to 24 cm or approximately 10 in).
Grazed plains, however, would probably get just over half as much
accumulation as the fallow plains.
Around twice as much snow would accumulate in ditches and drainages.
In contrast, windswept ridges and hilltops would have much lower
snowpacks.
Wind speeds typically diminish on steep hillsides, with accumulation
totals ranging from 28.5 to 42
cm (~11 to 16.5 in).
Density
Although geography sets the stage for snowpack development, each type of
precipitation event has its
own impact on snowpack depth and density.
Before examining the precipitation types, we'll take a minute to discuss
density. Density is the most
important aspect of snowpack since it determines the amount of runoff
and the stability of a
snowpack. Stability is critical for avalanche considerations.
When discussing density, we tend to think in terms of weight per volume,
with a typical snow density
being 0.1 gram per cubic cm (g/cm3). That makes snow one tenth as dense
as water because it is
composed of both water and air.
When talking about snowpack, we express density as the depth of the pack
vs. the depth of the water
that would be produced if the snow were melted. This is known as the
snow water
equivalent or SWE. For example, a snowpack that is 100 cm
(39.4 in) deep will melt to
produce a volume of water 10 cm (3.9 in) deep.
Hydrologists like the term SWE because it tells them how much water will
run off when the snowpack
melts. Meteorologists typically use another term to discuss the density
of snow:
snow-to-liquid ratio or SLR. SLR is a unitless ratio of
snow depth to liquid depth
(SWE).
The SLR is the inverse of density, meaning that the higher the SLR, the
lower the density of a
snowpack. Using our previous example, snowpack with a density of 0.1 has
an SLR of 10:1.
SLR is high for light, powdery
snowpack (up to about 40:1)
SLR is low for snowpack with older or
drifted snow (as low as
6:1 or 7:1)
SLR is even lower for very wet
snowpack (as low as 2:1)
Density Question
Assume that you're a hydrologist and want to know how much
runoff a particular snowpack
will produce. Let's assume that the snowpack has an SLR of
5:1 (meaning that if it were
melted, the depth of water would be 20% of the original snow
depth). If the snow depth
is 20 in (51 cm), how much water is that equivalent to?
Select the correct answer, then click Done.
The correct answer is b.
To get the liquid equivalent or SWE,
you divide the snow depth
(20 in) by the SLR (5:1). In this case, the SWE is four
inches.
Please make a selection.
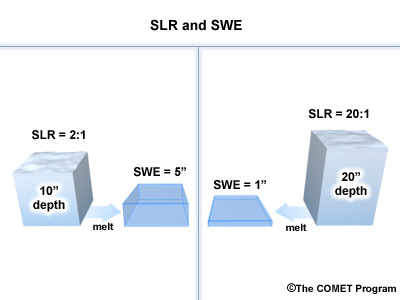
Snowpack Depth & SWE
Does a deeper snowpack always produce more water? The snow depth on the
left side of the graphic is
10 in (25 cm), a dense snowpack with an SLR of 2:1 that would melt down
to a SWE of 5 in (13 cm). In
contrast, the snow depth on the right is 20 in (51 cm), the SLR for that
low-density, fluffy
snowpack is 20:1, and the SWE is only 1 in (2.5 cm). The snowpack on the
left will produce five
times as much snowmelt as the one on the right, even though it's only
half as deep.
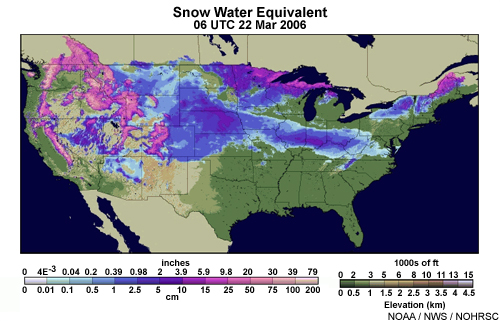
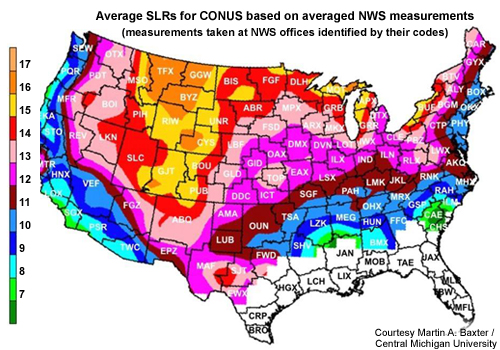
This map shows how average snowpack density values vary across CONUS. The
lower SLR values (the
wetter, denser snow) correspond to more maritime climates, while the
higher values are
characteristic of colder and/or higher elevation snowfalls in the
interior of the country.
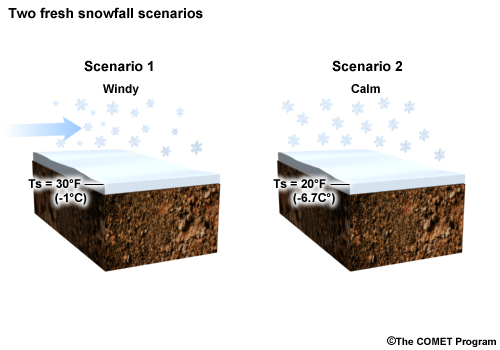
Density & Wind
Consider these scenarios. Both take place in flat terrain,
where it's snowing moderately.
In the first scenario, the surface temperature is 30ºF
(-1ºC) and it's windy. In the
second scenario, the surface temperature is 20ºF (-7ºC) and
the wind is calm. Which
situation would you expect to have higher-density snowpack,
all other factors being
equal?
Select the correct answer, then click Done.
The correct answer is a.
Scenario one is likely to have much
denser snow accumulation due
to the warmer temperature, which enables the air to hold
more moisture. When the
surface temperature is at or near freezing, the density
of new snowfall is usually
high. In addition, the stronger wind in the first
scenario will fracture the
snowflakes prior to depositing them, resulting in
packed, denser snowpack.
Please make a selection.
Precipitation Types
Various types of precipitation impact snowpack: dry snow, wet snow,
graupel, sleet (also called ice
pellets), freezing rain, rain, freezing drizzle, and drizzle.
What impact does each precipitation type have on the density and depth of
snowpack? Assume that the
snowpack is fresh and relatively dense.
Select the correct answers in the listboxes for each
precipitation type, then click Done for
the feedback.
Dry Snow
Dry, low-density snow decreases the
density or SWE of a
relatively dense pack. It also increases the depth of
the pack.
Please make a selection.
Wet Snow
Wet snow generally increases both
snowpack density and depth. But
if a thin layer of wet snow falls on a thin layer of dry
snow, the depth could
actually decrease due to compaction.
Please make a selection.
Graupel
Graupel is high-density frozen
precipitation that typically
increases snowpack density and depth.
Please make a selection.
Sleet (ice pellets)
The high density of sleet causes the
underlying snowpack to
compact, which decreases its overall depth. As the sleet
layer accumulates, it
increases the density of the snowpack.
Please make a selection.
Freezing rain
Freezing rain freezes upon contact
with the snowpack, forming a
thin layer of dense, hard ice on top. It typically
decreases snowpack depth as its
weight causes the underlying snowpack to settle. Note
that freezing drizzle has a
similar, although less intense, impact as freezing rain.
Please make a selection.
Rain
Rain leads to melting and refreezing
in the top of the snowpack,
which increases the density of the pack. Rain also
decreases snowpack depth. Note
that drizzle has a similar, although less intense,
impact as rain.
Please make a selection.
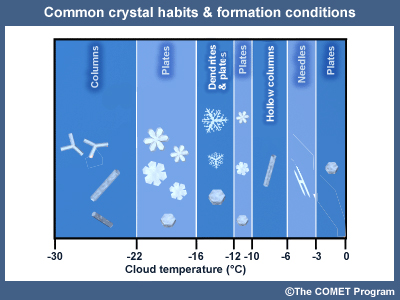
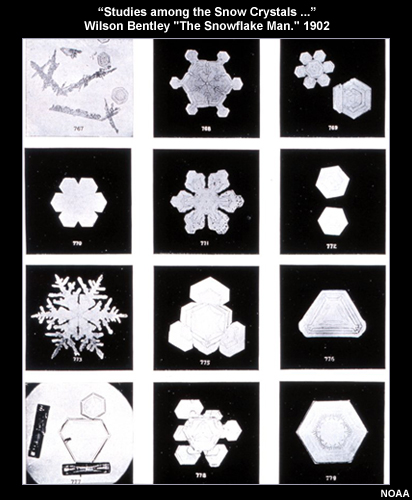
Snow Microphysics
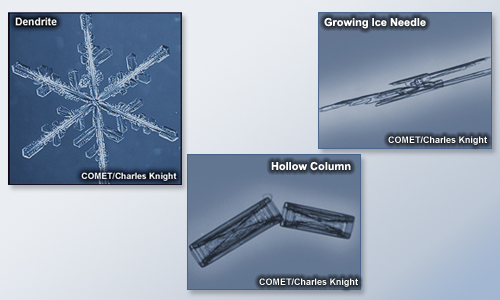
All snow, be it wet or dry, originates as ice crystals in the atmosphere.
These crystals form
different shapes (habits) depending on the temperature and moisture
content of the atmosphere. The
primary habits are dendrites, plates, columns, and needles. In general,
each is produced at the
following atmospheric temperatures.
Dendrites and plates: -22°C to -10°C (-8°F to
14°F)
Needles: -10°C to -3°C (14°F to 26°F)
Columns: -10°C to -3°C (14°F to 26°F) and colder
than -22°C (-8°F)
Dendrites are the fastest-growing crystals and tend to aggregate into
larger snowflakes that result
in low-density snowpack at cold temperatures. In contrast, smaller
crystals, such as columns,
needles, and plates, tend to accumulate into a higher-density snow
layer.
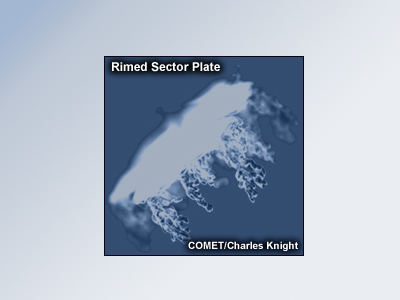
Other factors that also increase snowpack density include:
Riming, which occurs when any type of ice crystal passes through a
super-cooled cloud (one whose
liquid water droplets are below 0°C or 32°F). Rimed
crystals are partially or
completely coated in tiny frozen water droplets and are associated
with higher-density snow
accumulation.
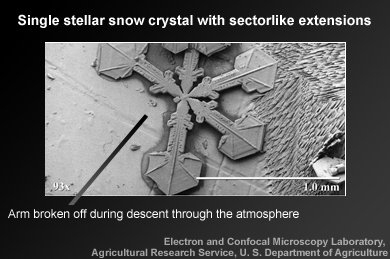
The presence of broken crystals. Crystals can fracture when they hit
each other as they descend
through the atmosphere or when they strike the ground. Higher winds
lead to more fractured
crystals, which increases snowpack density.
Snowpack evolution is often referred to as snowpack metamorphism. The
characteristics of a snowpack,
such as its depth, density, layering, degree of bonding, and
temperature, change over time
regardless of whether more precipitation falls. Metamorphic processes
become more important as dry
periods persist.
Our study of snowpack evolution spans three sections.
In this first section, we examine the basic processes that affect
snowpack evolution, such as
conduction and radiation
In the next two sections (Scenarios 1 and 2), we use scenarios to
explore other factors that
affect snowpack evolution, such as the different types of weather
events; both scenarios occur
over the same period of time (from fall to spring) but take place in
different types of terrain
(a relatively flat, open area vs. a mountainous region)
Before getting started, we need to define some terms.
Snow grains refer to the ice crystals within a snowpack
rather than those in the
atmosphere.
Bonding refers to the degree to which grains are
aggregated (clustered together) or
not. For new snowfall, the degree of bonding is generally greater if the
crystals are of similar
sizes.
Ethan Greene on bonding:
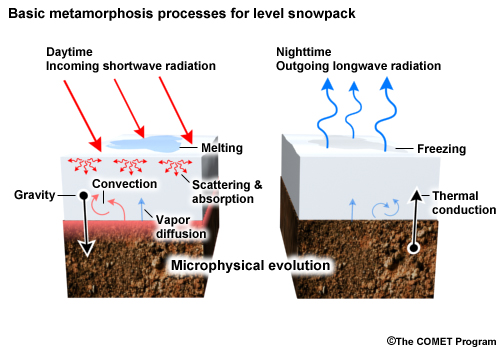
Gravity & Conduction
The basic metamorphism processes that affect snowpack evolution are
gravity, conduction, radiation,
vapor diffusion, and, to a lesser extent, convection. We’ll describe
each process on this and the
following pages of this section.
Gravity
In general, gravity acts to pull snowpack straight downward toward the
ground on flat slopes. It
increases the density of the snow after the snowpack becomes established
in a process called
settling.
Over sloped surfaces, a portion of the gravitational force is directed
parallel to (along) the slope
rather than vertically. This portion increases with slope steepness and
is responsible for moving
snow downhill.
Conduction
Conduction is the direct transfer of thermal energy from warmer to cooler
substances that are in
contact with each other. Conduction is present in snowpack when there
are changes in temperature
within the pack or at the top or bottom. Conduction often occurs in fall
when ground temperatures
are warmer than the snowpack. A temperature gradient forms, causing the
ground to heat the lower
portion of the snowpack.
Note that ground temperatures just below the snowpack are typically near
0°C except in
permafrost regions of the high latitudes, where they can be
significantly colder. In these areas,
snowpack temperatures more than a few centimeters away from the ground
can be as low as -60°C
depending on the ambient air temperature.
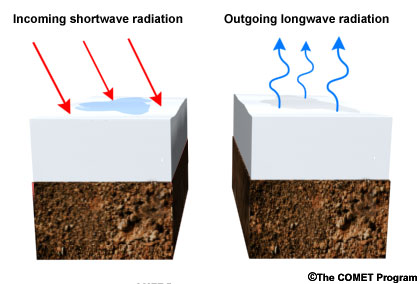
Radiation
Radiation is primarily responsible for inducing the
melt/freeze process, which
results in crusting and other types of crystal evolution. Two types of
radiation are important for
snowpack evolution.
Incoming shortwave (solar) radiation
Solar energy reaching the Earth's surface is reflected, absorbed, or
scattered, depending on the type
of surface. Snowpack is particularly reflective, especially when the top
of the pack contains newly
fallen snow. The degree of a surface's reflectivity is referred to as
its albedo or
ratio of reflected solar energy to incoming solar energy. The albedo of
snow is relatively
large—typically in the range of 0.3 to 0.9. This means that 30% to 90%
of the energy is reflected
back to the atmosphere.
The albedo depends largely upon the age of the snow at the surface, with
old snow having lower
albedos than new snow: 0.3 to 0.5 as compared to 0.6 to 0.9. That's
largely due to the presence of
foreign matter such as dirt and dust, which are less reflective and have
lower albedos. Albedo is
also dependent on the size of the crystals in the top of the snowpack,
with smaller crystals having
larger albedos.
Outgoing infrared radiation
All surfaces on Earth, be they bare ground or snowpack, constantly emit
infrared radiation. The
amount is primarily controlled by factors such as the temperature of the
surface and the presence of
nearby or overhanging vegetation. For snowpack, the warmer and more
vegetation-free the surface, the
greater the rate of radiative loss. This cools the snowpack at the very
top few mm
of the surface. Contrast this with the warming effect
of incoming solar radiation,
which heats up the top 15 to 30 cm (6 to 12 in) of
snowpack.
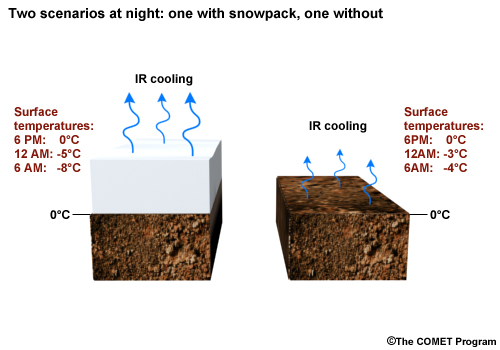
On a calm, clear night, a snow-covered surface will cool much more
quickly than a bare one given the
same surface temperatures. That's due to several factors. Even though
both surfaces have the same
temperature at sunset, the snow radiates heat very efficiently,
increasing the rate of heat loss at
the surface. Snow is also a very good insulator. This prevents heat from
rising through the
snowpack, which allows the surface to cool quickly. In contrast, bare
soil conducts much more heat
upward from below, which helps slow down cooling at the surface.
Phase Changes, Including Vapor Diffusion
Radiation and conduction are processes that transfer thermal energy. Each
induces changes in snowpack
between solid ice, liquid water, and water vapor.
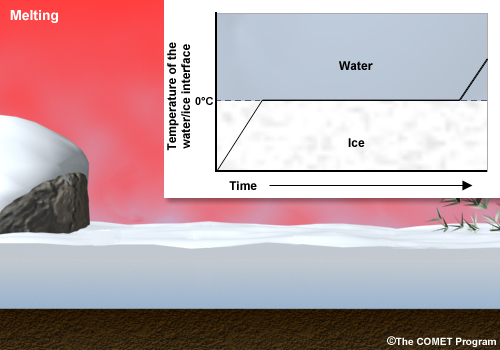
Melting is a phase change from solid ice to
liquid water. As ice melts,
it absorbs a great deal of energy from the surrounding
environment, which significantly
slows the warming of the snowpack. As a result, the
temperature rise in a warming
snowpack stalls at 0°C (the melting point) as ice
changes to water.
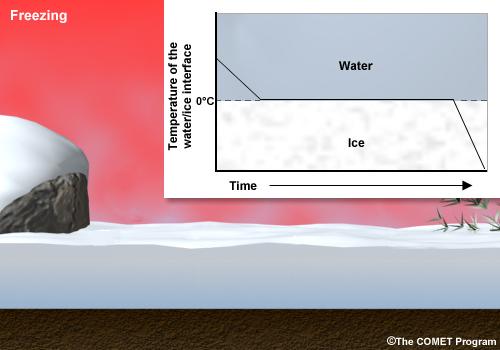
Freezing is a phase change from liquid water
to solid ice. As water
freezes, it actually releases heat, which significantly
slows the cooling of the
snowpack.
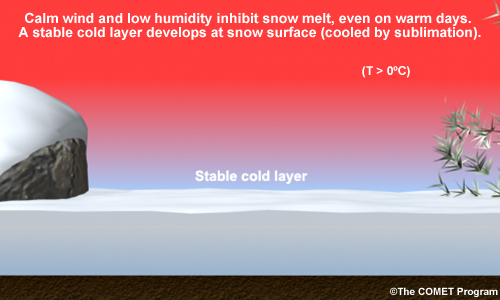
Sublimation is a phase change from ice
directly to water vapor. It
occurs most commonly and quickly at the surface of a
snowpack on dry, sunny days.
Sublimation absorbs much more energy from the surrounding
environment than melting,
creating a shallow, stable layer just above the snowpack.
This occurs despite the sunny
conditions and inhibits the melting of the pack.
Vapor Diffusion
Now we'll discuss the important process of microphysical vapor diffusion,
which is critical for
snowpack evolution.
This simple schematic shows how ice molecules move within a snowpack
when the ground is
warmer than the snowpack. The process involves millions of
ice and water vapor
molecules.
Snow crystals (snow grains) are interspersed with microscopic air
pockets. These air pockets have a
given temperature and vapor pressure (the part of air pressure that's
due to water vapor). The air
at the bottom of the pockets is warmer than that above since it's closer
to the (warmer) ground.
This results in temperature and vapor pressure gradients.
As the animation below shows, the water molecules move from high to low
vapor pressure by sublimating
off the snow grain at the bottom of the pocket and moving upward and
attaching onto the snow grains
at the top. This involves changing from vapor back to ice, a process
called vapor deposition. The
result is that the upper snow grains grow at the expense of those below,
resulting in a net
transport of ice mass upwards.
If the temperature gradient is large, the upper crystals will grow
quickly. The vapor
molecules attach to the bottom of the crystals in flat
layers rather than simply
enlarging the size of the grains. These flat edges are called crystal
facets.
In sum, two phase changes occur with warm temperatures below and cool
temperatures above in snowpack:
Sublimation of the lower crystals (a phase change from ice to vapor)
Vapor depositional growth of the upper crystals (a phase change from
vapor to ice)
The process is reversed when the ground is colder than the snowpack (an
unusual situation).
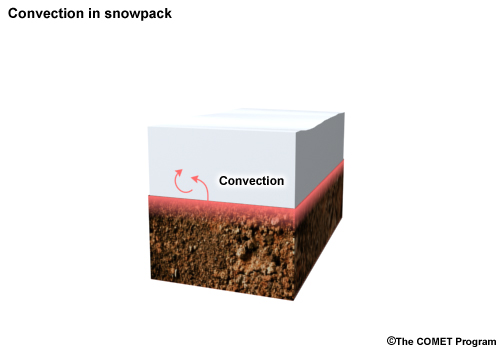
Convection
In the lower portion of the snowpack, convective processes, albeit weak
ones, can be important if the
snowpack is relatively porous. We see this with Arctic snowpack that has
evolved over days and weeks
into very porous layers of snow grains. The convection is caused by warm
air at the bottom of the
snowpack rising into the porous layers above. The rising motion can
extend over a meter upward
depending on the depth of the pack and the porosity of the layers. The
primary effect of convection
is to transport small amounts of heat upwards.
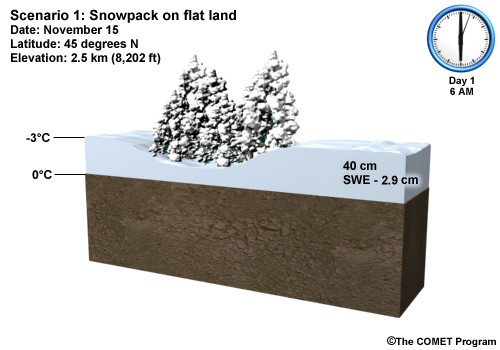
Scenario 1: Flat Land
Initial Conditions
Introduction
This section uses a scenario to explore snowpack evolution in flat
terrain. The scenario begins on
November 15 in a region of flat, open terrain with some areas of
vegetation. The area sits at an
elevation of 2.5 km (8,202 ft) and latitude of 45°N. (You could
find this kind of place in
Wyoming.) The area was free of snow when it experienced a significant
snowstorm last night.
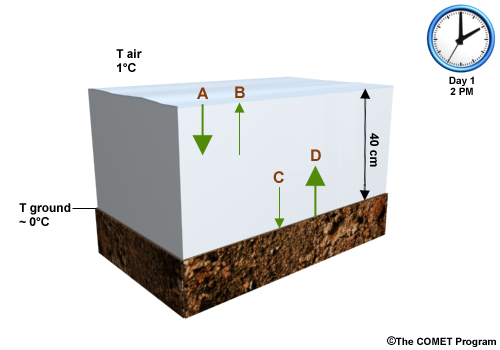
It's now sunrise, which we'll say is 6:00 am local time. The snow has
stopped, skies are clear, and
there are 40 cm (15.7 in) of fresh snow on the ground. The temperature
at the top of the snowpack is
-3°C (27°), and the ground temperature is 0°C
(32°F). The water content of the
snowpack (its SWE) is 2.9 cm (1.1 in).
Given the relatively dry snow, what crystal habits and sizes
would likely comprise most
of the snowpack?
Select the correct answer, then click Done.
The correct answer is a.
The snow-to-liquid ratio is
approximately 14:1 (40 divided by
2.9), which is generally considered an average to
slightly-below-average SLR for
this elevation. Due to the low density, we can infer
that the majority of the
snowfall consists of dendrites and aggregated dendrites.
Small and rimed crystals
have a lower SLR and result in denser snow.
Please make a selection.
Effect of Trees on Snow Distribution
Vegetation has a strong influence on the initial snowfall distribution
and its subsequent
redistribution, with more snow accumulating in clearings than in
adjoining forests.
Given the relatively dry snow, what crystal habits and sizes
would likely comprise most
of the snowpack?
Select the correct answer, then click Done.
The correct answer is b.
The ground in treed areas receives 20 to 45% less
snow than in adjoining clear
areas primarily because of the interception by tree
branches. But the size of
the clearing is important too. If it's larger than
the height of the trees, the
area can become windswept, with the windblown snow
accumulating in the forest.
Note that when the snow on forest floors is
untouched by the sun and wind, it's
less prone to subsequent sublimation.
Ethan Greene on the impact of vegetation on snowpack:
Please make a selection.
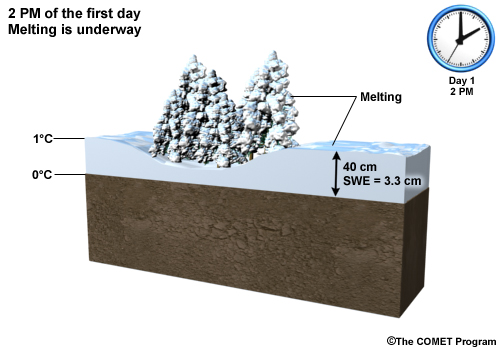
Melting
Since we're in late autumn and approaching the winter solstice, the
daytime solar energy is near its
annual minimum. The solar energy heats the upper snowpack surface
relatively slowly throughout the
middle part of the day and begins melting the snow around noon.
What is the albedo of the snow likely to be in the early
afternoon?
Select the correct answer, then click Done.
The correct answer is c.
The clear skies and fresh snow result
in relatively high albedos,
probably in the range of 0.7 to 0.8. This means that 70
to 80% of the solar
radiation is reflected back to space.
Please make a selection.
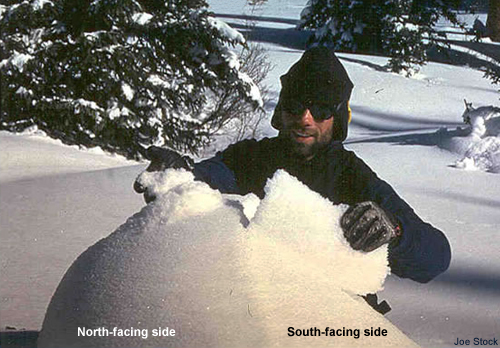
Day 1, 2pm: Aspect
Aspect is the direction that an object or tilted ground surface faces.
We're looking at a large tree
stump covered in snow. Notice the dramatic melting on the south-facing
side and the undisturbed
snowpack on the north-facing side. The snow on the dark, cold side
remains as it was when it fell,
whereas a melted layer has formed (and subsequently crusted) on the
south-facing side.
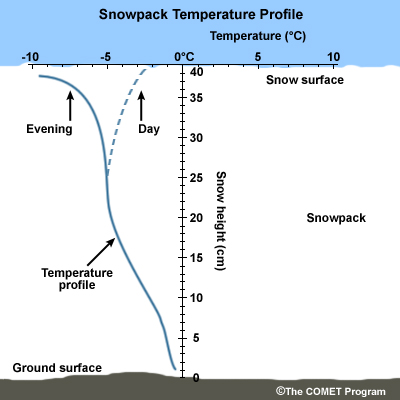
Day 1, 2pm: Temperature Profile
To what approximate depth does the sun heat the snowpack at
2pm? In which direction is a
thermal gradient created?
Select the vector corresponding to the correct
strength and direction of the
gradient, then click Done.
Note that the vectors point from cold to warm, with their
widths representing the
strength of the gradient (strong vs. weak).
The correct answer is b.
Since we're in late autumn near the
winter solstice, the upper
snowpack surface will melt relatively slowly. The
melting will last a few hours each
day if atmospheric conditions remain calm and clear.
This means that the thermal
gradient is small and is directed upward. Recall that
with new snow, solar radiation
will warm 15 to 30 cm (6 to 12 in) of the top of the
pack.
Please make a selection.
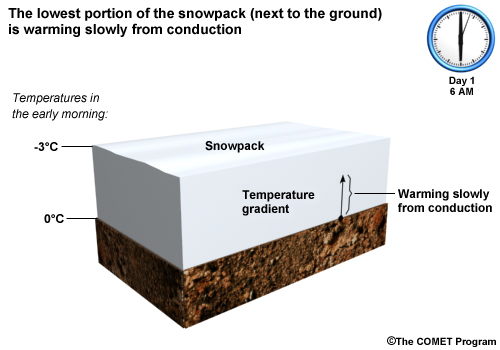
Day 1, Conduction Starting at Sunrise
Conduction began when the snow started accumulating. At sunrise, the
temperature was 0°C (32°F) near
the base of the pack and -3°C (27°F) at the top (the same as the air
temperature above). This caused
a small temperature gradient, with the snow next to the ground warming
slightly from conduction.
This process will continue as long as the adjacent ground surface stays
warmer than the snowpack.
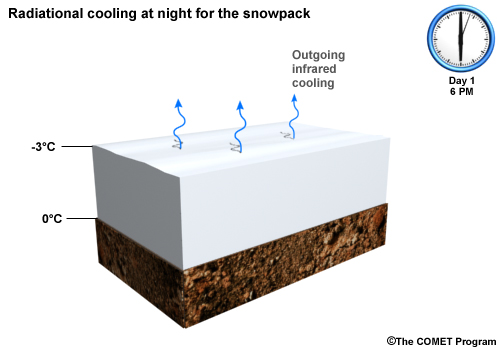
Day 1, 6pm: IR Cooling
In the early evening, radiative cooling quickly takes over and the top of
the snowpack cools very
quickly. In contrast to solar absorption, the vast majority of radiative
loss happens within a few
millimeters of the top of the snowpack. In our case, since the outgoing
radiative loss is much
larger than the daily solar radiative gain, nighttime temperatures at
the top of the snowpack are
much lower now.
To what approximate depth does the sun heat the snowpack at
2pm? In which direction is a
thermal gradient created?
Select the vector corresponding to the correct
strength and direction of the
gradient, then click Done.
Note that the vectors point from cold to warm, with their
widths representing the
strength of the gradient (strong vs. weak).
The correct answer is b.
Melting will stop because the surface
temperature of the snowpack
falls well below freezing after sunset. Crusting (the
freezing of the snowpack
surface) occurs quickly around sunset.
Please make a selection.
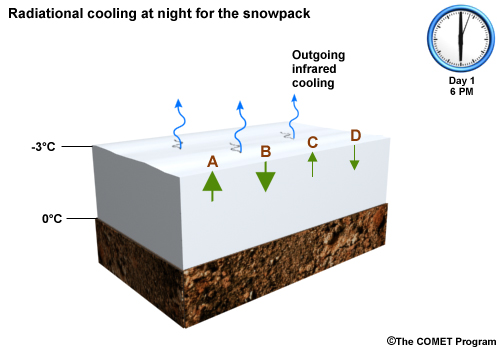
Day 1, 6pm: Temperature Gradient
What would you expect to happen to the temperature gradient
in the upper portion of the
snowpack during the night if atmospheric conditions are
clear and calm.
Select the vector that corresponds to the correct
strength and direction of the
thermal gradient, then click Done.
Note that the vectors point from cold to warm, with their
widths representing the
strength of the gradient (strong vs. weak).
The correct answer is b.
Radiative cooling will maximize as
the evening progresses. The
top few millimeters of the snowpack will cool very
rapidly, resulting in a strong
temperature gradient directed downwards.
Please make a selection.
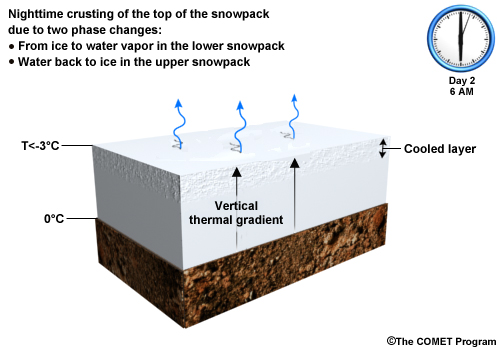
Day 2, 6am: Radiative Recrystallization
The intense vertical thermal gradient present the next morning (day two)
has transported moisture
from lower down in the snowpack to the top layer, causing the ice grains
in about the top 5 cm (1.9
in) of the snowpack to grow. This process, known as radiative
recrystallization, involves two phase
changes: one from ice to water vapor in the lower snowpack, the other
from water vapor back to ice
in the upper snowpack.
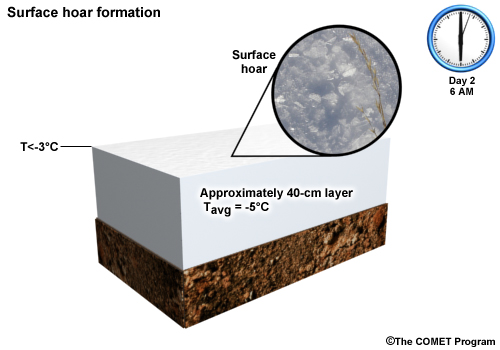
Day 2, 6am: Surface Hoar
Some of the water vapor particles moving up through the snowpack escape
into the atmosphere right
above the pack and freeze upon contact with the colder air temperatures.
This results in the
formation of surface hoar at the top of the pack. Surface hoar is large,
rounded, feathery crystals
(snow grains) with flat edges that grow rapidly.
To summarize, surface hoar forms when:
Atmospheric conditions are calm and clear and the snow at the top of
the pack has cooled rapidly
overnight due to longwave radiative cooling
A strong temperature gradient in the snowpack is accompanied by a
vapor pressure gradient that
drives water vapor out of the snow and into the atmosphere very
close to the snow surface
The water vapor freezes, forming hoar crystals
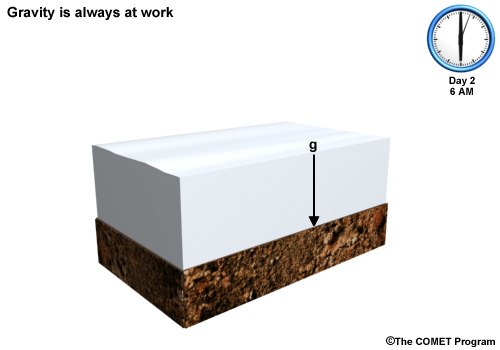
Day 2, 6am: Gravity
Gravity is always at work, causing snow depth to decrease over time. As
the snowpack ages or settles,
its density gradually increases, which generally makes the snowpack more
stable.
Gravity never works in isolation. Other processes, such as wind events
and precipitation, often have
a more dramatic effect on snowpack density and stability.
Note that when we mention stability in the context of snowpack, we're
really talking about the
likelihood of avalanche formation. A stable snowpack is less likely to
fail and form an avalanche.
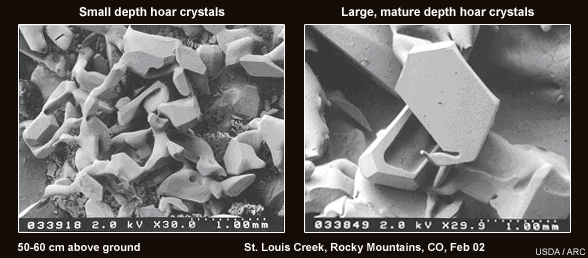
Day 4, 6am: Depth Hoar Formation
Long, undisturbed periods of cold atmospheric temperatures and radiative
loss at the top of the
snowpack have a cumulative effect, with most of the snowpack steadily
cooling. Since the ground
remains relatively warm because it's insolated by the snow, the
temperature gradient increases. If
it gets large enough, depth hoar can form. Depth hoar is highly faceted,
large, feathery crystals
that grow on the edges of existing snow grains.
These electron microscopy images show depth hoar crystals, first at a
very small size (a few tens of
micrometers), then at a large, mature size. Notice that the depth hoar
grows at the expense of the
pre-existing snow grains.
Depth hoar typically forms over several days. Although the crystals are
bonded, together they form a
weak, brittle structure. If you try to pick up or move a layer dominated
by depth hoar, it will
disintegrate. Note that weak layers of depth hoar are a significant
concern from an avalanche
perspective, since they can be the source of fractures and slides.
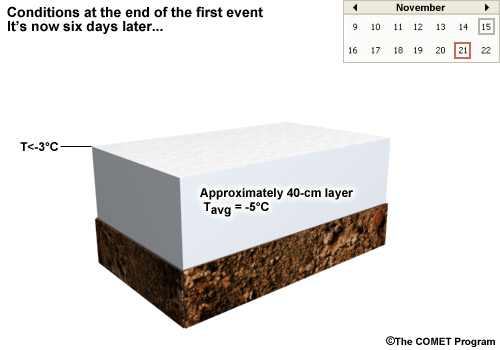
New Events
Introduction
It's been six days since the initial snowstorm. How would a wind storm, a
dust storm, another
snowfall, and other types of precipitation events impact the snowpack?
We'll see what happens,
returning to day six at the outset of each event so we can examine its
impact on the same set of
conditions.
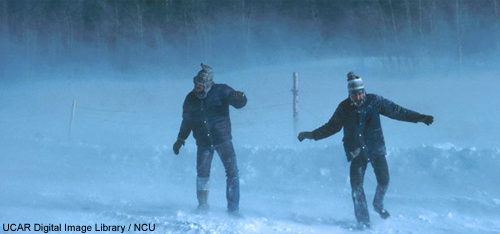
Snow Redistribution by Wind
New Event: Wind
A windstorm sweeps through the area six days after the initial snowfall,
with speeds up to 18 m/s (35
kt). Before we examine its impact on the snowpack, we'll take a general
look at wind and snowpack.
The redistribution of snow by wind is a critical aspect of snowpack
evolution. Even in relatively
flat terrain, strong winds can cause widely varying snow depths in
adjoining areas. While a flat,
open, wind-blown area might be snow-free, deep snowdrifts can surround
obstacles or form in small
terrain depressions. (That's why it's important to choose a
representative location when measuring
snow depth, avoiding scoured areas or snowdrifts.)
Wind can transport snow when wind speeds are above ~5 m/s (~10
kt). This threshold
depends on the characteristics of the snow surface though. Weaker winds
can move low-density snow
whereas older, hardened snow surfaces may only begin to move with much
stronger winds.
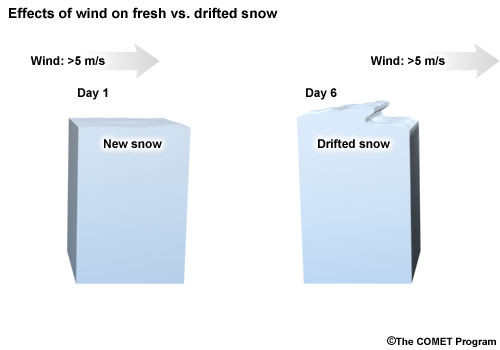
Impact of Wind
Which snowpack would be impacted more by winds greater than
the 5 m/s (~10 kt) threshold?
Select the correct answer, then click Done.
The correct answer is a.
Drifted snowpack is harder to lift
and move because the snow
grains are typically fractured, smaller crystals. As
they accumulate, they pack
together more tightly, making them more resistant to
wind. For a given wind speed,
the denser the snowpack, the less the snow will be blown
and redistributed.
Please make a selection.
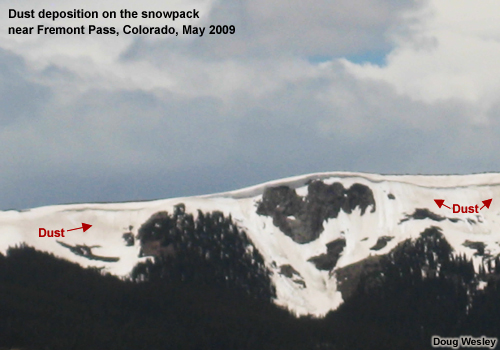
Dust
New Event: Dust
Six days after the initial snowfall, a dust storm sweeps across the
region. Dust storms are created
by very strong low-level winds moving across arid regions. The dust
moves downstream in the
atmosphere and resettles on snowpack when the wind speed decreases or
the dust particles are scoured
out by precipitation. Scouring is a process in which precipitating ice
or water particles collide
with other airborne particles, such as dust. These particles are carried
along with the
precipitation down to the ground.
As you can see, dust discolors the top of snowpack. What
impact would you expect this to
have on the albedo of the pack?
Select the correct answer, then click Done.
The correct answer is c.
If the dust is not covered by
additional clean snow, it will
significantly reduce the albedo of the snowpack, causing
the top of the pack to melt
significantly during daytime. In fact, general
springtime snowmelt speeds up
significantly when “dirty” snow is present.
Please make a selection.
Dust Layers
Dust deposits on snowpack become a layer—first at the top of the snowpack
and then submerged if
additional snow falls. When the dust is in the top layer, the decrease
in albedo accelerates
melting. As melting proceeds, the dirt remains on top and merges with
any previously established
dust layers to form one strong, thick dirty layer.
Furthermore, the dust embedded within the snowpack can induce internal
melting and freezing. The
resulting internal layers may exhibit a reduced degree of bonding that
can affect snowpack stability
in mountainous regions.
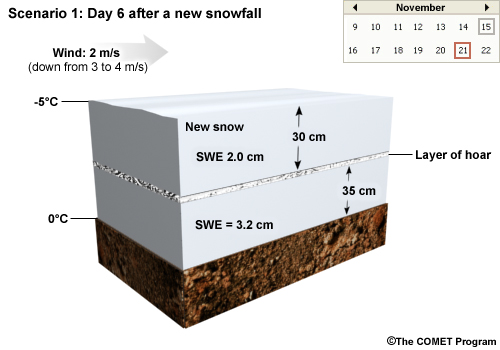
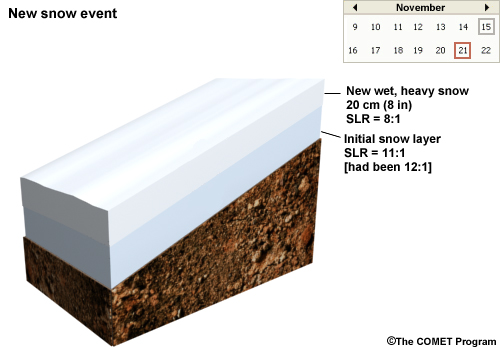
More Snow
New Event: Snow
Let's say that in the six days since the initial snowstorm, the following
has happened:
The old snow has settled to a depth of 14 in (35 cm)
There's a layer of surface hoar
The SWE has decreased slightly from 1.30 to 1.26 in (3.3 to 3.2 cm)
due to sublimation
(evaporation of snowpack)
The snow-to-liquid ratio (SLR) is ~10:1
We've just received approximately 12 in (30 cm) of new snow.
The air temperature is -5°C (23°F)
The SLR is ~15:1
The SWE is 0.8 in (2.0 cm)
The wind was 3 to 4 m/s (6 to 8 kt) when the new snow was falling
but has calmed down and is now
2 m/s (~5 kt)
Impact of New Snow
What are the most important impacts of the new snowfall on
the snowpack?
Select the correct answer(s), then click
Done.
The correct answer is d.
Option A is incorrect because the wind speed is
below the 5 m/s (10-kt)
threshold for drifting.
Option B is incorrect because depth hoar
originates within the snowpack, not
on top.
Option C is incorrect because the new snow is
relatively dry and lighter
than the old snow (the SLR is 15:1 compared to
~10:1).
Option D is correct because although the new
snow is relatively light, it's
deep enough that the additional weight will
likely compact the old snow even
further.
Please make a selection.
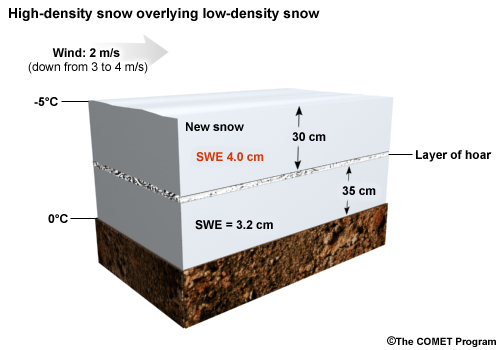
High-Density Snow Over Low-Density Snow
Assume that the SWE of the new snow is 1.6 in (4.0 cm)
rather than the 0.8 in (2.0
cm) that we just discussed, making it a very dense, wet snow layer. This
type of snow tends to
develop with warmer atmospheric and surface temperatures.
Higher-density snow overlying lower-density snow can lead to an unstable
snowpack, one prone to
collapse, since the bonds in the lower layer may not be strong enough to
withstand the additional
weight. Unstable snow situations occur in flat areas all the time but do
not lead to avalanches due
to insufficient slope steepness.
When the density of the snow increases during a single snow
event, we get an
upside-down snow situation. Generally speaking, the
higher-density layer is
stronger than the lower-density layer. In flat areas, the denser, upper
layer speeds the compaction
of the lower layer, but on a steep slope, the situation can lead to an
avalanche.
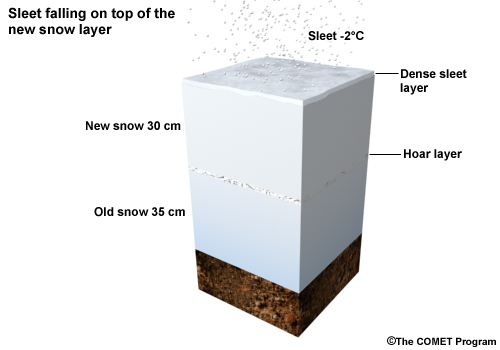
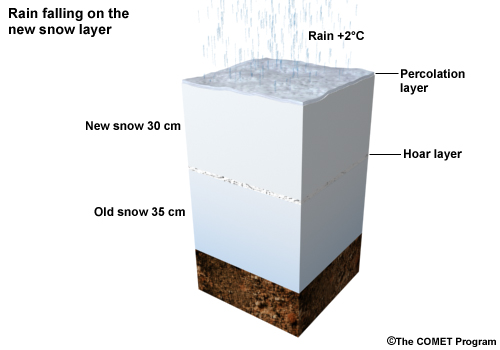
Other Precipitation Types
New Events: Various Precipitation Types
Consider what would happen if the following precipitation events occurred
after the second snowfall:
rain, freezing rain, sleet, freezing drizzle, and graupel.
What immediate impact would each type of
precipitation have on the
snowpack?
Select the correct answer in the box
beside each statement. When
you are finished, click Done.
Note that each
precipitation type only matches one
statement so it should only be selected once.
Each option will be discussed in more
detail on the next page.
Please make a selection.
More About the Precipitation Types
Click on each type of precipitation to learn more about
it.
Freezing rain accumulates as a very dense, hard layer of ice
on top of the snowpack.
Graupel acts as a very dense, heavy layer of particles, which
can compact the top of the
old snow. When graupel is buried, it is a weakly bonded
layer.
Freezing drizzle accumulates as an ultra-thin, very dense,
hard layer of ice on top of
the snowpack.
Sleet accumulates as a dense layer on the top of the snowpack
and compacts the top of the
old snow layer.
Raindrops percolate into the top few cm of the snowpack,
creating a wet snow layer. The
mixture will eventually freeze when temperatures fall. When
crusting occurs, the
associated heat release caused by the freezing produces a
temperature gradient in the
snowpack and facets grow on the snow crystals just below the
crust, forming flat edges.
If snow falls after that point, we'll have a buried layer of
faceted crystals next to a
hard ice layer, which could lead to cracking and collapsing
in the new snow layer.
Springtime Melting
March and Beyond
We've skipped forward to March. An upper ridge (a high-pressure system
associated with clear, dry
weather) has developed in the atmosphere. Daytime temperatures are in
the +3°C to +8°C range (37° to
46°F). Since that's above freezing, significant melting is occurring on
the top of the snowpack.
The warmer the atmospheric temperature, the greater the rate of melting.
In general, melting adds
liquid to the top of the snowpack, which increases the density of the
upper layer.
The vast majority of liquid from melting or rain moves down through
vertical channels in the snowpack
unless it encounters an ice layer, in which case the water will pool
above it, freezing if
temperatures fall. If atmospheric temperatures stay warm, the water will
keep moving horizontally
until it finds another vertical channel.
If the water encounters a capillary barrier, it will move parallel to the
snow layers rather than
through them. A capillary barrier forms when a layer with small pore
spaces rests above one with
large pore spaces. The gradient in pore sizes creates a barrier that the
water runs along.
At night, when the air temperature falls back below freezing, the top
layer freezes into a crust
whose density is near that of water (many times higher than snowpack).
The latent heat release from
the crusting process enhances temperature gradients within the snowpack.
This can lead to edge
growth (faceting) on the snow grains and create layers of reduced
stability.
The cycling of melting and freezing can occur diurnally or with the
passage of storm systems that are
common during the spring season.
In the spring (and early summer at higher elevations), snowpack coverage
typically becomes spotty.
Melting accelerates at the bottom fringes of the snowpack due to
conduction from the adjacent
warmer, bare ground.
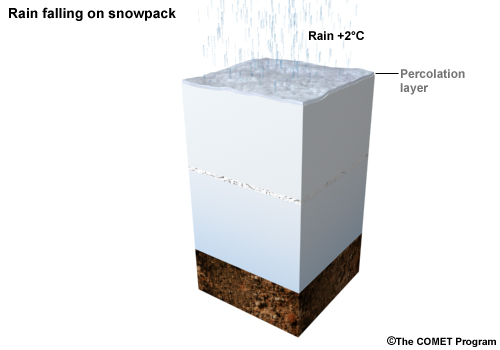
Rain
Rain falling on the snowpack is inherently warmer than the pack and
provides additional energy for
melting, which accelerates the melt process.
No land mass is perfectly flat. Areas with just a slight slope are prone
to flooding from excessive
snowmelt.
If the land under the snow is frozen, it cannot absorb much water from
the snowmelt. The water will
travel downhill even if the slope is minimal and can lead to flooding.
Scenario 2: Mountains
Initial Conditions
Introduction
This scenario takes place in mountainous
terrain rather than the flat
terrain of Scenario 1. How would you expect snowpack
evolution to differ in the two
scenarios based solely on the difference in terrain?
For each process or event, select
the correct answer, then click
Done.
Gravity has a greater impact in
sloped situations since it can
cause layers to detach and slide. Note that gravity
causes snowpack to settle faster
in flat terrain.
Please make a selection.
Sloped surfaces do not necessarily
add to or subtract from the
number of layers.
Please make a selection.
Snowpack is often unstable in both
flat and sloped terrain but
the impacts are far more severe in mountainous areas.
Just think of slides and
avalanches.
Please make a selection.
Terrain has a huge impact on
precipitation distribution. Terrain
features affect the type and amount of snowfall, with
upwind slopes (upslope areas)
typically receiving more precipitation than other
slopes. Precipitation distribution
is typically more even in flat terrain, especially in
areas well away from mountains
and large bodies of water.
Please make a selection.
Snow redistribution from wind events
can create unstable
conditions over sloped terrain. For example, drifting
snow can create cornices on
the lee side of ridge lines that can become so deep that
they fracture, causing an
avalanche. Recall that drifted snow is much denser than
non-drifted snow.
Please make a selection.
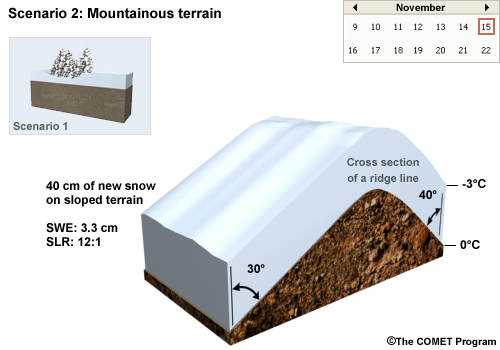
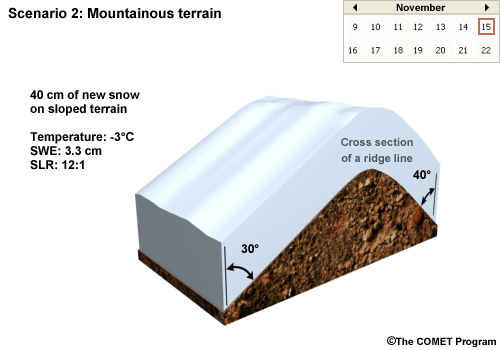
Scenario
Assume that a similar sequence of meteorological events occurs in this scenario as in
the first one.
Snow falls on bare ground on November 15, followed by several clear, calm
nights. Like Scenario 1,
this initial snowfall brings 16 in (40 cm) of new snow, with the surface
temperature at -3°C (27°F)
at the end of the storm. The SWE is 1.3 in (3.3 cm equivalent) and the SLR is
12:1. This scenario is
also at 45°N latitude.
Then four more weather events occur, followed by springtime melting. As in
scenario 1, we will treat
the four events as if they occur independently of each other, not in consecutive
order.
We are going to focus on a ridge line whose slopes are 30 and 40 degrees
respectively. Because of the
slopes, we have to consider snowpack movement, which involves several important
factors. These include
gravity, friction, and deformation, which we'll explore on the following pages
(before the additional
weather events occur).
Gravity
Gravity causes avalanches to occur on sloped but not flat terrain. We'll use these
graphics to see why.
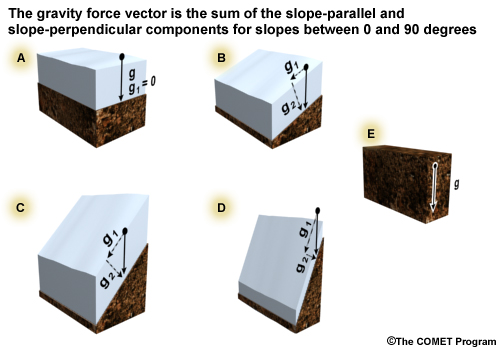
Like all forces, gravity can be described in terms of vectors, with the gravity
vector drawn to indicate
the direction of its pull. The total gravity vector remains constant.
In flat terrain (A), gravity pulls the snowpack straight downwards towards the
ground.
When a slope is introduced (B, C, D), the total force of gravity remains the same but
the gravity vector
can be represented by two components:
One that's parallel to the slope (that runs along it), g1
One's that's perpendicular to the slope, g2
There are several important relationships between the two components.
The component that's parallel to the slope increases as the slope steepens.
Conversely, the
component that's perpendicular to the slope decreases as the slope steepens.
When the slope is vertical (E), the slope-perpendicular vector is reduced to
zero so all of the
gravitational force is directed parallel to the slope.
Avalanches
Avalanches form on slopes mild enough for snow to accumulate but steep enough for it
to slide. Generally,
this includes slopes between 30 and 45 degrees, although the slope threshold can be
as steep as 60
degrees in maritime climates.
Every slope has a limit as to how deep the snowpack can be without sliding. That
limit decreases as
steepness increases, meaning that the steeper the slope, the less snowpack it can
hold. If a slope is
too steep, snow will not accumulate significantly so the slope will remain bare.
Different types of avalanches form depending on the characteristics of the snowpack.
These include slab,
point-release, slough, wet, and dry avalanches.
For more information on avalanches, please refer to other training materials, such
as:
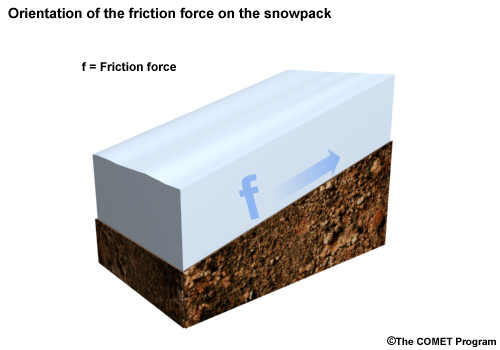
Friction inhibits the movement of the snowpack at its interface with the ground and
is always directed
parallel to the slope. However, its orientation is directly
opposite that of the
slope-parallel gravitational component. Frictional resistance increases as surface
roughness increases.
Friction is the primary factor that lets snowpack build up on sloped surfaces, rather
than just sliding
downslope. To illustrate this, imagine a plane of glass with a coffee mug on it. You
don't have to tilt
the glass much to get the mug to slide off. The glass is very smooth and produces
little frictional
resistance. If you change the glass to a sandstone surface, you'll have to tilt it
much higher to get
the same effect. This is due to the rough surface of the sandstone, which inhibits
objects resting on it
from moving due to its high frictional force.
Snow Deformation
Many people think that snowpack behaves as a solid mass, unable to stretch, compress,
or bend. In fact,
snow is a viscoelastic material, meaning that an entire snowpack or particular layer
can shear and
stretch. Understanding this is important when assessing the stability of a snowpack.
Snow layers can move in several ways:
By gliding, where the entire snowpack detaches at the bed (underlying surface)
and moves slowly down
the slope; the same process occurs with avalanches but at a much faster pace
By creep, the slow, differential movement of a slab down the slope, with the
upper portion traveling
faster than the lower portion; this process occurs slowly, but can produce
tension in the snowpack
that can eventually produce a slide
Grain Types and Stability of Layered Snowpack
Layers form in a snowpack from the various snowpack processes that we've discussed,
including thermal
gradients, melting/freezing, radiative processes, and precipitation events. Layers
can represent
weaknesses in the snowpack because fractures tend to occur along their interfaces.
Which of the following grain types commonly form persistent weak layers
within a snowpack?
Select the correct answers, then click Done.
The correct answers are a and d.
Depth hoar and other faceted grains have edged,
flat surfaces. These
grains inherently form weak layers that can reduce stability over
long periods of time.
The other types of grains, such as pristine snow crystals, do not
last very long or form
strong, well-bonded layers. Note that if a strong layer overlies a
weak one, the
situation can be unstable.
Please make a selection.
New Events
Overview
We've examined the factors that characterize snowpack in complex terrain. Now we'll
see what happens when
additional atmospheric events occur: a wind storm, a dust storm, another snow event,
and a rainstorm,
all of which lead to a layered snowpack. Remember that layers are a primary
determinant of the stability
of a snowpack in regard to avalanche formation. Multiple events can create snowpack
layers of varying
densities, which can lead to unstable conditions.
As in Scenario 1, we'll treat the four new precipitation events as if each one
occurred several days
after the initial snowfall rather than in consecutive order. This will let us
examine the effect of each
event on the same set of conditions. Then we'll skip ahead to March, when springtime
melting begins.
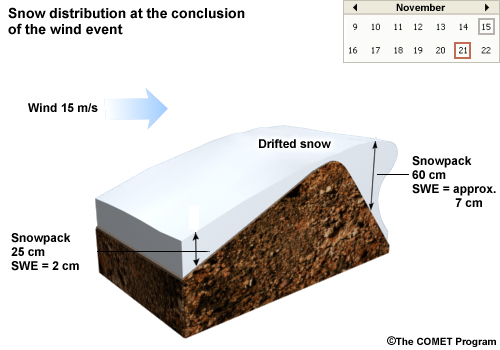
Wind
Six days after the initial snowfall, a 15-m/s (30-kt) wind event occurs, which lasts
twelve hours.
In general, wind can significantly redistribute snowpack in the mountains where high
wind speeds are
common. With wind speeds of 15 m/s, snow depths can be at least 50% higher in
redistributed areas. The
depth is typically greatest on the lee or downwind side of a ridgeline. The location
of the maximum is
typically dependent on the wind speed, with higher speeds usually corresponding to
distances further
downwind from the crest.
When wind redistribution occurs relatively quickly (on the order of several hours),
it produces stress
that a formerly stable snowpack may not be able to resist. The quickly added weight
may lead to an
avalanche.
Redistributed snow is inherently of higher density than undisturbed snow. When it
accumulates on
low-density snowpack, it forms a slab. The slab increases the weight of the
snowpack, to the point where
it may exceed the counteracting force of friction. When this occurs, the slab can
fail, causing an
avalanche.
If subsequent snowfall covers redistributed snow, high-density layers will be created
within the pack.
Dust
New Event: Dust
Let's see what happens if the initial snowfall is followed by a high wind event that
deposits dust on top
of the snowpack.
If the dust layer is covered by new snowfall, it will become internal to
the snowpack. What
impact might this layer have on the pack's stability?
Select the correct answer, then click Done.
The correct answer is b.
If the dirty layer is close enough to the
surface to absorb solar
radiation (15 to 30 cm or 6 to 12 in), two things may occur:
The dust-laden surface will lower the albedo, creating a
local temperature
gradient; this will cause edge growth on the snow grains and
create a weak layer
The submerged layer may melt, possibly leading to an
avalanche of wet, slushy
snowpack
Please make a selection.
Snow
New Event: Snow
The initial 16-in (40-cm) snowfall had an SLR of 12:1, which has probably decreased
to about 11:1 in the
six days following the event. Then we get 8 in (20 cm) of wet, heavy snow, with an
SLR of 8:1.
What impact might the new layer of wet, heavy snow have on the pack's
stability?
Select the correct answer, then click Done.
The correct answer is b.
Since the lower portion of the snowpack is six
days old, it has had
time to evolve and could well contain depth hoar (a weak layer). The
added weight of the
new, heavy snow poses a risk that the weak layer may fracture or
collapse.
Please make a selection.
A Variation
New Event: Snow Variation
What would happen if the original snow layer was much drier—if the SLR was at least
15:1? If the slope
was steep enough, inconsequential, point-release avalanches would probably occur
after the initial
snowfall. Then, with the addition of the second, heavier snow, the top slab would be
even more likely to
slide, creating a larger, heavier, and longer avalanche or slide.
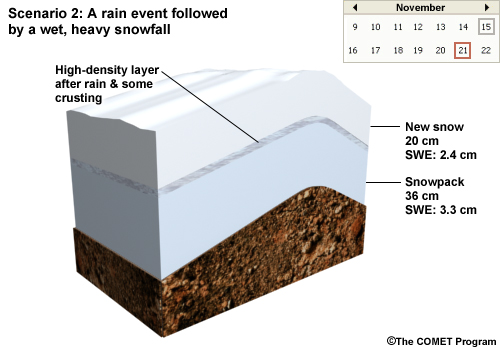
Rain
New Event: Rain
Let's say that in the six days following the initial snowfall, the original 16-in
snowpack became
slightly denser while its depth decreased slightly. The SLR was about 11:1. Then the
surface
temperatures warm, a storm approaches, and significant rainfall occurs. Most of the
rain (about 0.2 in
or 0.5 cm) occurs at 36°F (2°C). The top of the snowpack is transformed into a
high-density layer, with
some crust forming after the rain and the passage of a cold front. As is typical in
mountainous
locations, snow falls after the cold front passes and is wet and heavy, with a
liquid equivalent of 2.4
cm (1 in) and an SLR of approximately 8:1 to 9:1.
Now we have a relatively thick layer of crust and high-density snow that's 20 cm (8
in) down in the pack.
Snow grains in the crusted layer have a low degree of bonding, so the presence of
this weak layer can
decrease friction, thereby reducing the stability of the snowpack.
Spring Melt
Introduction
It's now March and springtime melting has begun. Melting produces liquid in
or on the top of the
snowpack, which is pulled along the slope or down through the pack by
gravity. The rest of the
process is similar to that described in the flat land scenario.
(To summarize, the routing of the water depends on the structure of the
snowpack. If the liquid
runs into obstacles, it will travel along the path of least resistance,
which a layer may
provide. If there's too much water, it will either pond or travel
vertically. If the water
encounters a capillary barrier, it will move parallel to the snow layers
rather than through
them.)
Impacts of Snowmelt
Let's look at the impacts of snowmelt. For each statement below, decide if it
is right or wrong,
then click Done.
Melting increases the potential for flooding.
The correct answer is a, true.
Snowpack runoff can cause flooding depending on
the amount and
capacity of the drainages.
Please make a selection.
Melting decreases stability at layer interfaces that have refrozen during
cold periods.
The correct answer is a, true.
Layer interfaces can become liquid paths and
subsequently freeze at
night or during cold periods. These crusted layers may lead to
significant hoar
formation over long periods of time due to local temperature
gradients.
Please make a selection.
Melting warms the atmosphere, which can subsequently accelerate the rate
of snowmelt.
The correct answer is b, false.
Melting actually cools the atmosphere near the
snowpack. If this
latent cooling didn't occur, the snow would melt even more quickly.
Please make a selection.
Springtime Snowpack Stability
Here are comments by Ethan Greene about snowpack stability in springtime.
Walking on Springtime Snowpack
What's it like to walk across snowpack in springtime when snowmelt is occurring?
Snowmelt in Mountainous Areas
Snowmelt is discharged into drainages in mountainous terrain and into ponds, lakes,
and relatively flat
rivers in level terrain. Each drainage has a limit as to the amount of runoff it can
handle, beyond
which flooding will occur.
The rate of melting depends on several factors:
The low-level temperatures of the atmosphere, with warmer temperatures leading
to more melting.
The presence and amount of liquid precipitation. In general, rain melts snow
when atmospheric
temperatures are relatively warm. But when they are very close to freezing, the
rain usually freezes
as it percolates into the snowpack. The heat release associated with this
freezing warms the pack to
near the melting point so that any additional heating will melt it much more
quickly.
The type of ground cover. If the surface is frozen soil or rock slab, little
snowmelt will be
absorbed; most of it will move horizontally, pool, or move downhill, increasing
runoff. If the
surface is unfrozen soil, the ground can absorb water more easily, decreasing
runoff.
Of course, snowmelt runs off faster in sloped regions than flat areas.
Here Ethan Greene discusses springtime snowmelt:
Ideal Snowpack
The notion of an “ideal” snowpack depends on one's perspective and interests. What's
good for farmers may
be bad for road crews. Consider the following scenarios. Whose interests does each
one best match?
Select the best answer for each scenario. (Note
that each should
only be chosen once.) When you are finished, click Done.
Please make a selection.
Snowpack Assessment
Onsite Measurements
Introduction
A hydrologist needs to monitor water supplies to determine flooding potential. An
avalanche forecaster
needs to decide whether to issue any warnings. A climate researcher needs lots of
ground and atmospheric
observations to assess and monitor climate trends. These are the types of situations
that require a
steady stream of snowpack data gathered regularly throughout the cold season.
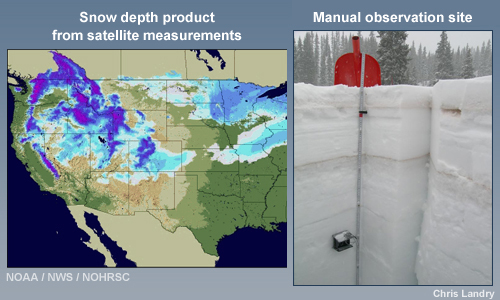
Snowpack is monitored extensively over many areas of the world, usually by government
agencies. There are
two primary methods: remotely-sensed (primarily satellite-based) and onsite
(in-situ). Both methods
measure a standard set of characteristics throughout the full snowpack depth to
provide a complete
profile analysis.
This section describes the various techniques used to assess snowpack, primarily in
the context of
avalanche stability. The techniques range from simple, hand-based tests to those
that use complex tools
to obtain precise measurements.
Snow Courses
Onsite measurements, known as snow courses, are an essential part of determining
avalanche
conditions—both current and past as well as those that may occur in the future.
Onsite measurements are
taken at fixed sites on both flat and sloped surfaces at regular intervals
throughout the cold season.
They are also taken at particular sites to address specific needs, such as the
likelihood of avalanche
formation. In these cases, a partial or full profile of the snowpack is assessed.
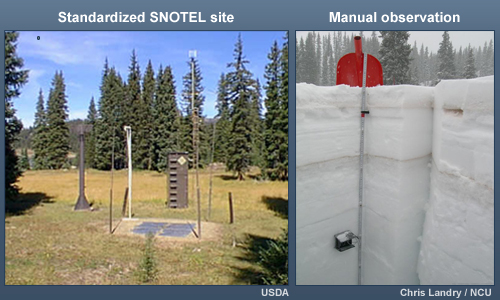
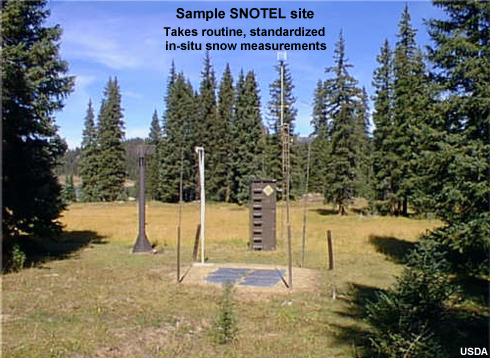
In the United States, there are two types of onsite measurements: manual
techniques and
routine, automated, in-situ measurements called SNOTELs. SNOTEL
stands for snowpack
telemetry. As of 2009, there were more than 1,200 manually-measured snow courses and
over 750 SNOTEL
sites in the western U.S. states, including Alaska.
Before starting the discussion of onsite measurements, it is strongly recommended
that you review two
chapters of the American Avalanche Association's "Snow, Weather, and Avalanches:
Observational
Guidelines for Avalanche Programs in the United States" guide.
"Snowpack Observations” at
https://www.americanavalancheassociation.org/swag. Please
refer
to it as you read through the module's descriptions of snowpack assessment
techniques since it
provides more detailed information than can be included here. The chapter can
also be downloaded and
used as a guide in the field.
Manual, onsite observations are typically taken in snow pits dug out with shovels.
Visual observations
are particularly good at revealing crystalline and other characteristics that are
important to snowpack
stability and melting.
Ideally, snow should be observed in its native state, undisturbed by tracks,
vegetation, rocks, or
collapsed layers. The walls of the pit should be vertical and clean, and straight,
vertical columns
should be sampled.
The primary goal of measuring a snowpack in the context of avalanches is to assess
the stability of the
layers. The measurement of all of the layer qualities is called a snow profile.
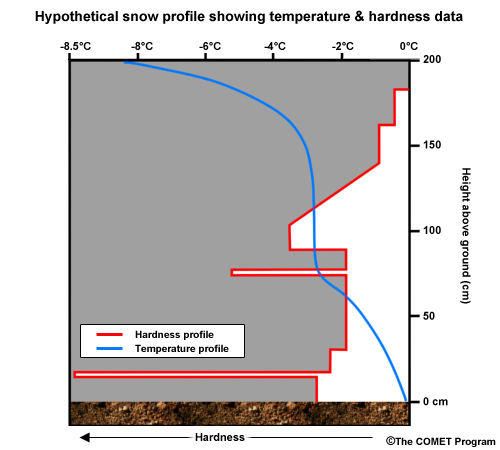
The snow profile is created by recording the following characteristics for each
layer:
Degree of wetness
Density and snow water equivalent
Depth
Hardness
Snow grain size and type (including whether bonding exists)
Temperature gradient
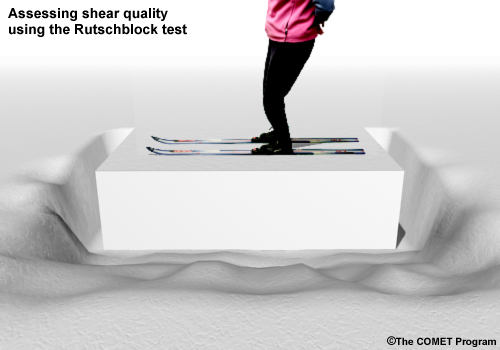
Shear quality
We'll examine these characteristics in more detail on the following pages.
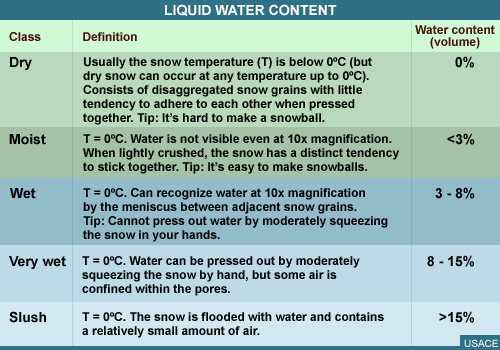
Degree of Wetness & Density, 1
You can get a quick sense of a snowpack's degree of wetness (its liquid water
content) by doing a simple
hand-based test that lets you characterize the snowpack as dry, moist, wet, very
wet, or slush. Simply
squeeze a handful of snow in your gloved hand and observe the amount of water
present. Use this chart to
determine the snow class.
A more accurate and formal way of assessing the water content of a layer is to first
measure its density
(mass per unit volume, for example, grams per cubic centimeter). This is done by
cutting out a
predetermined volume (chunk) of snow and weighing it.
The density is then converted to water content (snow-to-liquid ratio) by dividing the
measured density by
the density of water.
Degree of Wetness & Density, 2
Click the links to hear Ethan discuss the following topics.
Depth measurements are important to the avalanche community, hydrologists, and ski
resorts since they
indicate the amount of snow on the ground and provide an estimate of the amount of
snow that would slide
were an avalanche to occur.
A simple way to measure the thickness of a layer or the entire snowpack is to use a
ruler. Since snow
depths can vary widely in complex terrain, it is important to take multiple
measurements.
Click the links to hear Ethan Greene describe another technique for measuring snow
depth and the impact
of spatial variability on depth measurements.
To help determine the stability of a snowpack, we measure the relative hardness of
the layers. This
refers to the number of bonds per volume, which indicates the degree to which the
grains hold together
under external pressure.
A very hard layer over a very soft layer decreases stability, while a very soft layer
over a very hard
layer increases stability.
In the field, a layer’s degree of hardness is defined by the largest object
that can penetrate
the snow. You can get a quick sense of it by gently pressing objects of
varying sizes into
the snow and determining the largest object that can penetrate it. In order of
increasing hardness,
these are a fist, four fingers, one finger, a pencil, and a knife.
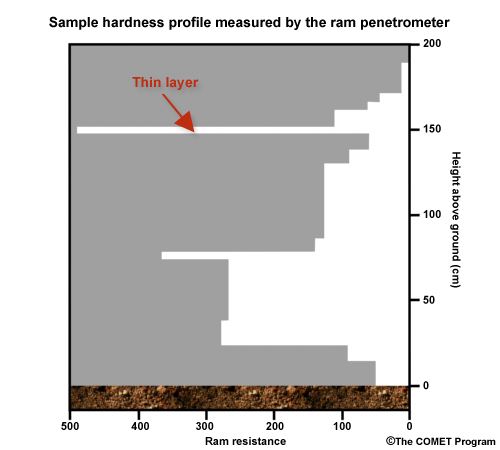
Hardness, 2
The more formal way of determining hardness is to use a ram penetrometer, which
measures resistance as it
is thrust into the snowpack layer. The greater the resistance, the greater the
layer’s degree of
hardness.
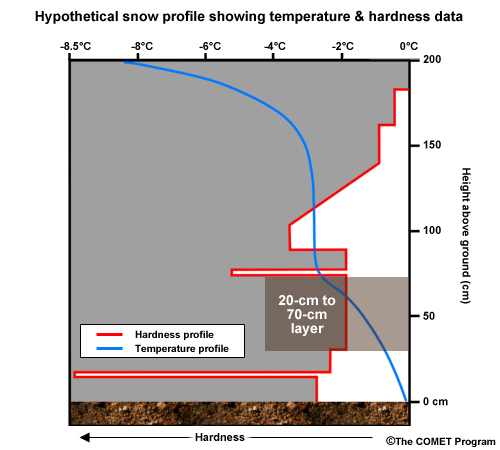
Here’s a hardness profile obtained with a ram penetrometer.
What do you think the thin layer near the top of the snowpack consists
of?
Select the correct answer(s), then click Done.
The correct answers are b and c.
Penetrometer resistance is very high for the thin
layer, indicating
that the grains are tightly bonded and likely to be crust. It could
also be a buried
dirt layer, since these often form hard ice layers. It cannot be
depth hoar or
low-density grains; these have a low degree of bonding, which makes
them easy to
penetrate.
Please make a selection.
Snow Grain and Type
Snow grain type and size are important to measure because of their relation to
snowpack stability. Hoar
and other facetized grains are typically large in size (over ~2mm in diameter) and
reduce snowpack
stability.
Simple magnifiers are used to assess the type of snow grain within a layer. The
graphic shows different
grain types.
Temperature
The temperature of a snowpack layer should be measured with a thermometer in the
shade and not be
contaminated by heat from the fingers. You can estimate temperature gradients by
taking measurements at
several depths in the pack.
Notice the difference between day and night temperatures in the top of this snowpack.
As you’ll recall,
solar radiation warms the top 15 to 30 cm (6 to 12 in), whereas outgoing infrared
radiation cools the
very top few mm.
Shear Quality
Shear quality is the resistance of the layers in a snowpack when an amount of
pressure is applied to one
layer, such as the top, and the rest are left alone.
Shear quality is measured by exerting increasing amounts of vertical pressure on the
top of the snowpack
until the top layer begins to move down the slope. There are several types of shear
quality tests.
The Rutschblock test is a rather crude, time-consuming technique
done on-site by a
snowpack expert on skis. First, the skier digs a u-shaped trench around an
undisturbed block of snow,
leaving the block attached on the uphill side. Then he or she performs a series of
increasingly
stressful maneuvers to see if the block will fail at any weak layers and begin to
move. These range from
gently stepping on the block to jumping up and down on it. The point at which the
block moves is
recorded.
The Stuffblock test is a variation on the Rutschblock test. It is
more quantifiable in
that pre-set amounts of weight are exerted on a column to see when it will fail.
To do the test, you fill a stuff sack with ten pounds of snow and drop it from
increasingly greater
heights onto a shovel blade on top of a column of snow, noting the point at which
the column fails. The
test can be done by skiers and non-skiers alike, which is an advantage in some
situations.
Snow Stability & the Extended Column Test
The Extended Column Test (ECT) is a relatively new technique for evaluating snowpack
stability. While the
Stuffblock and other tests identify layers in a snowpack that are likely to initiate
a fracture, the ECT
identifies layers that are likely to both initiate and propagate a
fracture. This helps
focus attention on unstable areas, where an avalanche really might occur. To do the
test:
Isolate a vertical column 90 cm (35 in) across a slope by 30 cm (12 in)
downslope
Apply pressure to one end of the column (the “loading” area) and see how
much pressure it
takes to transmit stress across the column to fracture it. Tap the end
of the column up to
thirty times: ten times from the wrist, then ten times from the elbow,
and finally ten times
from the shoulder
Note the the number of taps required to initiate a fracture; the number
of additional taps
required for the fracture to spread across the full column; and the
depth of the fracture
from the surface
Stop the test when the fracture has spread across the entire column or
you have given it 30
taps
It’s pretty easy to interpret the results. Fractures typically propagate across the
entire column within
one or two additional loading steps on unstable slopes. If the fracture propagates
across one or more
layers or breaks, it’s unlikely that fracture propagation will occur.
There are some limitations to be aware of. The test can overestimate snowpack
instability, for example,
when a thick hard layer overlies a weak one, or the upper layers of a pack are soft.
Like other tests, the ECT should be done in an area that is representative of the
entire slope.
Here’s a snow profile—the culmination of the in-situ, snowpit-based, snowpack
measurement process. The
results are depicted vertically on the plot, making easy to interpret the stability
of the snowpack
layers.
Which of the following statements are true of the temperature profile
(the line in blue)?
Select the correct answer(s), then click Done.
The correct answers are b and d.
Conditions are warmer in the lower portion of the
snowpack: near 0°C
(32°F), which is just barely freezing. Melting is not significant
because all of the
temperatures are at or below freezing. The vertical temperature
gradient in the 20-cm to
70-cm (8-in to 28-in) layer is significant since it’s conducive to
both the transport of
moisture upward and the growth of the upper grains at the expense of
the lower grains.
This leads to the formation of depth hoar, which decreases snowpack
stability.
Please make a selection.
Snow Profiles, 2
What can you infer from the hardness profile in red?
Select the correct answer(s), then click Done.
The correct answers are a and c.
The extremely high hardness values at 15 and 70
cm (6 to 28 in) are
indicative of ice. The deep snowpack above these shallow layers may
be less stable and
prone to slide if the slope is steep enough. The top 35 cm (14 in)
or so exhibits very
low hardness and is probably low-density snow. Given the layers with
highly variable
degrees of hardness, it's clear that there have been periods of
melting and snowfalls of
varying densities during the winter; it has not not been monotonous.
Please make a selection.
SNOTELs
The United States’ Natural Resources Conservation Service operates an extensive,
automated system for
collecting snowpack and related climatic data in the Western United States and
Alaska. This system is
called SNOwpack TELemetry or SNOTEL for short. The SNOTEL network consists of over
750 measuring sites
over complex terrain.
The table shows the physical properties measured and tools involved.
This example shows SNOTEL SWE measurements for a site in California in 2008 and 2009
(up to mid-March).
The plot is useful because it shows the data in a historical context, since 1971.
Note that the maximum
values of SWE typically occur in late February/early March.
Satellite Data
Microwave Wavelengths
Remote sensing of snow cover is done by low-orbiting satellites that have the spatial
and temporal
resolution required for accurate snow-related measurements.
Satellite observations have advantages over traditional ground measurements. For
example, they cover
large areas with near-uniform resolution and retrieve data from remote regions of
the world where onsite
measurements can be time consuming or nearly impossible to take.
Microwave wavelengths are best for assessing snow properties from a remote sensing
perspective—far more
so than visible or infrared wavelengths. That’s because microwave energy can
penetrate snowpack and is
reflected and emitted both from the surface and deeper within the pack. This makes
it sensitive to
parameters such as snow depth, snow water equivalent, snowpack temperature, snow
crystal type, wet-dry
state, as well as soil conditions below the snowpack.
In addition, microwave instruments also penetrate cloud cover and operate during both
day and nighttime.
This makes them useful for detecting snowpack conditions on a 24-by-7 basis.
The rest of this section presents products made from satellite-derived snow
observations.
Snow Water Equivalent (SWE) Product
Snow water equivalent (SWE) estimates have widespread applications in hydrology,
agriculture, and
emergency management.
This example, created from satellite and surface observations of SWE, shows snowpack
conditions during
late winter in the CONUS. Notice the high SWE values over the western mountain
ranges and the extreme
northern parts of New England, and the lower values (10 to 15 cm or 4 to 6 in) over
some of the flatter
areas of the northern fringes of the U.S.
Snow Cover Product
Snow cover estimates made primarily from satellite data are important to hydrology
and provide critical
input to numerical weather prediction models.
In this example, notice the extensive snow coverage over the higher latitudes of the
Northern Hemisphere
in February 2005.
Snowpack Depth Product
The snowpack depth product is made from microwave satellite data and is used to
determine post-snowstorm
depth. This information is of interest to, for example, transportation agencies and
those involved with
snow recreation.
Snow Top Temperature Product
Microwave satellites assist in determining the detailed distribution of temperatures
at the top of
snowpack, which is useful to hydrologists and others interested in assessing and
predicting snowmelt.
Temperatures at the top of the snowpack are also used to assess snowpack stability,
including the
potential for crusting at the top of the snowpack and surface hoar formation.
Snowmelt Product
Real-time estimates of snowmelt are possible using microwave satellite data. The
product helps identify
areas under threat from flooding and is used to analyze soil moisture through the
late winter and
springtime months.
Product Access
NOAA’s National Operational Hydrologic Remote Sensing Center (NOHRSC,
http://www.nohrsc.nws.gov/) and the
National Snow and Ice Data Center (http://nsidc.org/)
display these types of products for operational users.
The NOHRSC site has an “Interactive Snow Map” feature that lets you display all of
the remotely sensed
and in-situ global snowpack data for any site of interest in the United States.
Summary
Factors impacting snowpack development
At the global scale: Climate, elevation, latitude, terrain, solar variation
At regional and smaller scales: Geography, precipitation type, wind
Types of snowpack
Tundra: Thin, cold, windblown snow usually found above or north of tree line
Taiga: Thin to moderately deep, low-density snowpack found in forests in cold
climates
Alpine: Intermediate to cold, deep snow cover, typically low density
Maritime: Warm, deep snow cover with coarse-grained snow due to wetting
Prairie: Typically thin, moderately cold snow cover with substantial wind
drifting
Ephemeral: Thin, extremely warm snow cover that melts soon after being deposited
Snowpack density measurements
Snow water equivalent (SWE): The depth of water produced if the snowpack melted
Snow-to-liquid ratio (SLR): A unitless ratio of snow depth to SWE; high for
light, powdery snowpack
(up to about 40:1), low for snowpacks with older or drifted snow (as low as 6 or
7:1), even lower
for very wet snow
Crystal types (habits)
Dendrites: Fastest-growing crystals; are produced at atmospheric temperatures
from -11°C to -17°C
(12°F to 1°F); tend to aggregate into larger snowflakes that result in
low-density snowpack at cold
temperatures
Columns, needles, and plates: Smaller crystals that tend to accumulate into a
higher-density snow
layer; needles form with atmospheric temperatures of -10°C to -3°C (14°F and
26°F); columns from
-10°C to -3°C (14°F to 26°F) or colder than -22°C (-8°F)
Riming occurs when any type of ice crystal passes through super-cooled cloud
(liquid water droplets
below 0°C); rimed crystals are partially or completely coated in tiny frozen
water droplets, and are
associated with higher-density snow accumulation
Broken crystals: Crystals can fracture when they hit each other in the
atmosphere or strike the
ground; higher winds lead to more fractured crystals
Basic processes that affect snowpack development
Gravity: Pulls snowpack straight downwards on flat land,
increasing its density;
over sloped surfaces, a portion of the gravitational force is directed parallel
to the slope; this
increases with steeper slopes and is responsible for moving snow downhill
Conduction: The direct transfer of thermal energy from warmer
to cooler substances
that are in contact with each other; occurs at temperature gradients within a
snowpack or at its top
or bottom
Radiation:
Primarily responsible for inducing the melt/freeze process, which causes
crusting and other
types of crystal evolution
Two types are important for snowpack evolution:
Incoming solar radiation: Snow is highly reflective (has a high
albedo or ratio of
reflected solar energy to incoming solar energy), with albedos
typically 0.3 to 0.9;
incoming solar radiation heats up the top 15 to 30 cm (6 to 12
in) of snowpack
Outgoing infrared radiation: Cools the very top few mm of the
snowpack; the warmer
and more vegetation-free the snowpack surface, the greater the
rate of radiative
loss; snow radiates heat very efficiently and is a very good
insulator (prevents
heat from rising through the pack)
Phase changes: Radiation and conduction transfer thermal energy
and induce changes
in snowpack between solid ice, liquid water, and water vapor. All phase changes
induce either
cooling or warming of the surrounding air depending the type. Evaporation and
sublimation cool the
immediate atmosphere while condensation warms it.
Melting: Phase change from solid ice to liquid water
Freezing: Phase change from liquid water to solid ice
Sublimation: Phase change from ice directly to water vapor
Microphysical vapor diffusion: Water molecules move from warm to cool in
microscopic air
pockets, attaching onto other snow grains in flat layers; this process
usually occurs from
the warmer ground upward toward the snow surface
Convection: Occurs in relatively porous snowpack when warm air
at the bottom rises
into the porous layers above, transporting small amounts of heat upwards
Factors involved in snowpack evolution
Vegetation: Impacts snowfall distribution/redistribution, with
more snow (20 to
45%) accumulating in clearings than adjoining forests
Daytime solar energy: Heats the upper surface of the snowpack
Aspect (the direction a tilted surface faces): Melting is
strongest on sun-facing
sides (south in the Northern Hemisphere)
Radiative cooling after sunset: Quickly cools a few millimeters
of the top of the
pack
Crusting: Freezing of a snowpack surface that has previously
melted due to either
solar radiation or warm temperatures; often occurs just after sunset
Radiative recrystallization: Occurs when an intense vertical
thermal gradient
transports moisture from the lower part of the snowpack to the top layer,
causing ice grains in the
~top 5 cm (1.9 in) to grow
Hoar: Large, rounded, feathery crystals with flat edges that
grow rapidly
Surface hoar: Forms when snow at the top of the pack cools rapidly
overnight; a strong,
upward temperature gradient develops along with a vapor pressure
gradient that drives water
vapor out of the snow and into the atmosphere; the water vapor freezes
and forms hoar
Depth hoar: Takes several days of strong temperature gradients in the
snowpack to form;
causes highly faceted hoar crystals to grow on the edges of existing
snow grains; although
the crystals are bonded, they form a weak, brittle structure that can
cause a fracture or
slide
Wind: Can transport snow when speeds are over 5 m/s (~10 kt);
weaker winds can move
low-density snow whereas older, hardened snow surfaces may only start moving
with much stronger
winds
Dust storms: Created by very strong low-level winds moving
across arid regions; the
dust moves downstream in the atmosphere and resettles on snowpack, causing the
top to melt
significantly during daytime; when the pack melts, the top dust layer merges
with other dust layers,
forming a strong, thick, ‘dirty’ layer
High-density snow over low-density snow: Can lead to an
unstable snowpack, one
prone to collapse
Precipitation types
Dry snow: Typically decreases snowpack density and increases snowpack
depth
Wet snow: Generally increases snowpack density and depth, but if a thin
layer of wet snow
falls on a thin layer of dry snow, the depth can actually decrease due
to compaction
Sleet (ice pellets): Adds a high-density layer of ice to the very top of
the snowpack;
increases the density of a relatively dense snowpack while decreasing
its depth
Freezing rain: Freezes upon contact with the snowpack, forming a thin
layer of dense, hard
ice on top; typically increases snowpack density and decreases snowpack
depth
Freezing drizzle: Adds an ultra-thin, high-density layer to the top of
the snowpack
Graupel: High-density frozen precipitation that typically increases
snowpack density and
depth
Rain: Creates a wet snow layer in the top few cm of the snowpack; can
lead to melting and
refreezing in the top of the pack; increases snowpack density but
decreases snowpack depth
Springtime snowmelt
The warmer the atmospheric temperature, the greater the rate of melting
(adds liquid to the
top of the pack, increasing the density of the upper layer)
Most liquid from melting and rain moves down through vertical channels
in the snowpack
unless it encounters an ice layer, in which case it will pool above it
(freezing if
temperatures fall) and move horizontally
Water moves parallel to snow layers when there’s a capillary barrier (a
gradient of pore
sizes, from smaller to larger) that causes water to run through the
upper layer rather than
draining into the lower one
At night, when the air temperature is below freezing, the top layer
freezes into a crust
whose density is near that of water (many times higher than snowpack)
The cycling of melting and freezing can occur diurnally or with the
passage of storm systems
Aspects of snowpack evolution specific to mountainous terrain
Snowpack is often unstable in both flat and sloped terrain but the impacts are
far more severe in
mountainous areas
Gravity has a greater impact in sloped terrain since it can
cause layers to detach
and slide
Friction is the primary factor that lets snowpack build up on
sloped surfaces
rather than just sliding downslope
Terrain affects the type and amount of snowfall, with upslope
areas typically
receiving more precipitation than surrounding locations
Wind can significantly redistribute snowpack in the mountains
where high wind
speeds are common; snow depths can be at least 50% higher in redistributed
areas; the weight of the
additional snow can destabilize formerly stable snowpacks
Snow layers move by:
Gliding, where the entire snowpack detaches at the bed and moves slowly
down the slope; the
same process occurs with avalanches but at a much faster pace
By creep, the slow, differential movement of a slab down the slope, with
the upper portion
traveling faster than the lower portion; although creep occurs slowly,
it can eventually
produce a slide
Avalanches form on slopes mild enough for snow to accumulate
but steep enough for
it to slide; the steepness threshold generally ranges from 30 and 45 degrees (up
to 60 in maritime
areas)
Snowpack assessment
Two primary methods: Onsite (in-situ) and remotely-sensed (satellite-based);
both measure snow
depth, SWE, density, temperature, and the nature of the layers throughout the
snowpack to provide a
complete profile analysis
Onsite measurements (snow courses)
Taken at fixed sites at regular intervals throughout the cold season;
taken at particular
sites as needed
Manual observations
Taken in vertical snow pits dug out with shovels, with straight,
vertical columns
sampled
Snowpack wetness: Characterizes snowpack as dry, moist, wet,
very wet, or slush; to
measure it, squeeze a handful of snow and observe the amount of
water; or cut out a
volume of snow and weigh its density, then divide the measured
density by the
density of water
Snowpack depth: Use a ruler to measure the thickness of a layer
or the snowpack;
take multiple measurements to get representative samples
Snowpack hardness: Gently press a fist, four fingers, one
finger, pencil, knife into
the snow and determine the largest object that can penetrate it;
or use a ram
penetrometer to determine resistance as it’s thrust into a layer
Snow grain type and size: Use a simple magnifier to assess the
type of snow grain
within a layer; hoar and other facetized grains are typically
large and reduce
snowpack stability
Snowpack temperature: Use a thermometer in the shade; take
measurements at several
depths to estimate temperature gradients
Shear quality (the resistance of layers when an amount of
pressure is applied to one
layer): Exert increasing amounts of vertical pressure on the top
of the snowpack
until the top layer begins to move down the slope; the
Rutschblock test is done by a
skier who cuts out a u-shaped trench and applies pressure on it
(from gently
stepping on it to jumping up and down) to see when it fails; the
Stuffblock test is
more quantifiable since it uses pre-set amounts of weight; the
Extended Column Test
identifies layers that are likely to both initiate and propagate
a fracture, helping
to focus attention on unstable areas where an avalanche might
really occur
SNOTELs: An extensive, automated system for collecting snowpack
and related
climatic data in the Western U.S., including Alaska; measures solar radiation,
RH, snow depth, SWE
and snow weight, air temperature, wind direction/speed, soil moisture, soil
temperature,
precipitation, barometric pressure
Remote sensing
Covers large areas with near-uniform resolution, retrieves data from
remote regions
Microwave wavelengths are best for assessing snow properties because
their energy penetrates
snowpack and is reflected/emitted from the surface and deeper within the
pack; are sensitive
to snow depth, SWE, snowpack temperature, snow crystal type, wet-dry
state, soil conditions;
penetrate cloud cover; operate day and night
Products: SWE, snow cover, snow depth, snow top temperature, snowmelt
You have reached the end of the Snowpack & Its Assessment module. Please
consider taking the Quiz and sending a
User
Survey.
Contributors
COMET Sponsors
The COMET® Program is sponsored by NOAA National Weather Service
(NWS), with
additional funding by:
Air Force Weather (AFW)
European Organisation for the Exploitation of Meteorological Satellites
(EUMETSAT)
Meteorological Service of Canada (MSC)
National Environmental Education Foundation (NEEF)
National Polar-orbiting Operational Environmental Satellite System (NPOESS)
NOAA National Environmental Satellite, Data and Information Service (NESDIS)
Naval Meteorology and Oceanography Command (NMOC)
Project Contributors
Senior Project Manager
Wendy Abshire — UCAR/COMET
Project Lead/Instructional Design
Marianne Weingroff — UCAR/COMET
Principal Science Advisors
Dr. Ethan Greene — Colorado Avalanche Information Center (CAIC)
Dr. Doug Wesley — UCAR/COMET
Additional Content Contributors
Dr. Alan Bol — UCAR/COMET
Dr. Ethan Greene — CAIC
Jay Irwin (unaffiliated)
Matt Kelsch — UCAR/COMET
Spencer Logan — CAIC
Dr. Doug Wesley — UCAR/COMET
Graphics/Interface Design
Steve Deyo — UCAR/COMET
Brannan McGill — UCAR/COMET
Marianne Weingroff — UCAR/COMET
Multimedia Authoring
Carl Whitehurst — UCAR/COMET
Audio/Video Editing/Production
Seth Lamos — UCAR/COMET
References
Sturm, M., Holmgren, J., and Liston, G., 1995: A seasonal snow cover
classification system for local
to global applications, J. of Climate, 8, 1261-1283.
COMET HTML Integration Team 2020
Tim Alberta — Project Manager
Dolores Kiessling — Project Lead
Steve Deyo — Graphic Artist
Gary Pacheco — Lead Web Developer
David Russi — Translations
Gretchen Throop Williams — Web Developer
Tyler Winstead — Web Developer
COMET Staff, November 2009
Director
Dr. Timothy Spangler
Deputy Director
Dr. Joe Lamos
Administration
Elizabeth Lessard, Administration and Business Manager
Lorrie Alberta
Michelle Harrison
Hildy Kane
Hardware/Software Support and Programming
Tim Alberta, Group Manager
Bob Bubon
James Hamm
Ken Kim
Mark Mulholland
Wade Pentz, Student
Malte Winkler
Instructional Designers
Dr. Patrick Parrish, Senior Project Manager
Dr. Alan Bol
Lon Goldstein
Bryan Guarente
Dr. Vickie Johnson
Tsvetomir Ross-Lazarov
Marianne Weingroff
Media Production Group
Bruce Muller, Group Manager
Steve Deyo
Seth Lamos
Brannan McGill
Dan Riter
Carl Whitehurst
Meteorologists/Scientists
Dr. Greg Byrd, Senior Project Manager
Wendy Schreiber-Abshire, Senior Project Manager
Dr. William Bua
Patrick Dills
Dr. Stephen Jascourt
Matthew Kelsch
Dolores Kiessling
Dr. Arlene Laing
Dave Linder
Dr. Elizabeth Mulvihill Page
Amy Stevermer
Warren Rodie
Science Writer
Jennifer Frazer
Spanish Translations
David Russi
NOAA/National Weather Service - Forecast Decision Training Branch
Anthony Mostek, Branch Chief
Dr. Richard Koehler, Hydrology Training Lead
Brian Motta, IFPS Training
Dr. Robert Rozumalski, SOO Science and Training Resource (SOO/STRC)
Coordinator
Ross Van Til, Meteorologist
Shannon White, AWIPS Training
Meteorological Service of Canada Visiting Meteorologists